

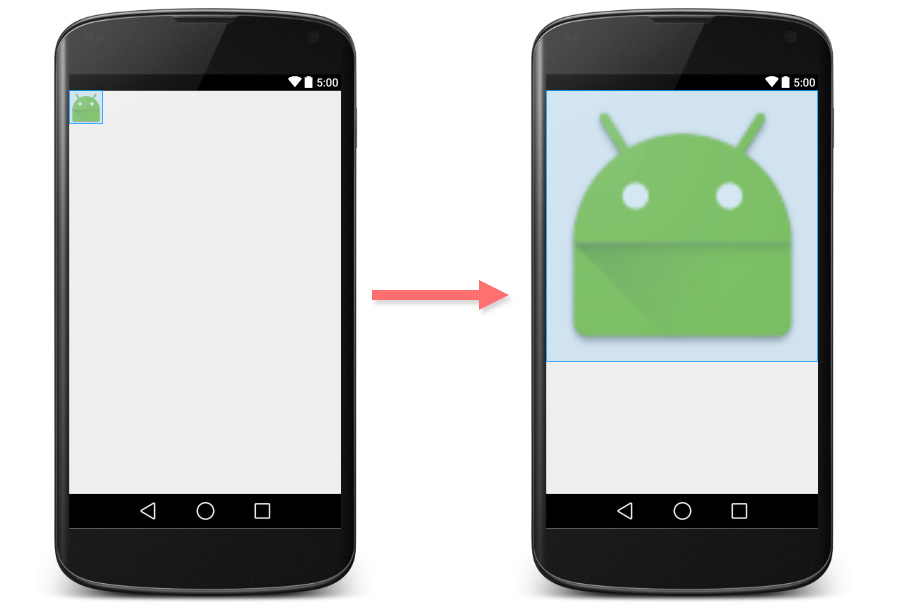
โจทย์ข้อนึงที่เจอในการเขียนแอพฯแอนดรอยด์แทบทุกตัวคือ "อยากจะเอารูปแปะลงไปบน UI แล้วให้ขยายขนาดขึ้นตามอัตราส่วนเดิม ต้องทำอย่างไร" ก็คืออยากได้ประมาณนี้
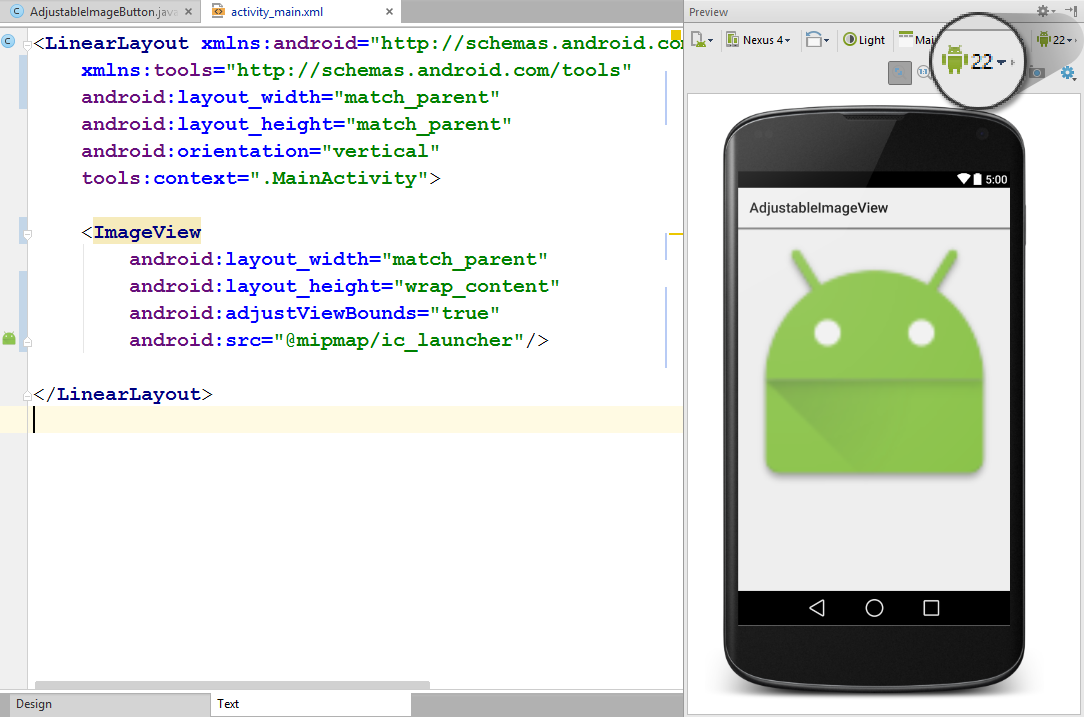
จริงๆแล้ว ImageView ได้เตรียมวิธีแบบง่ายๆมาให้แล้วคือการกำหนดค่า android:adjustViewBounds เป็น true ได้โดยตรง
<ImageView
    android:layout_width="match_parent"
    android:layout_height="wrap_content"
    android:adjustViewBounds="true"
    android:src="@mipmap/ic_launcher" />
ผลที่ได้คือ
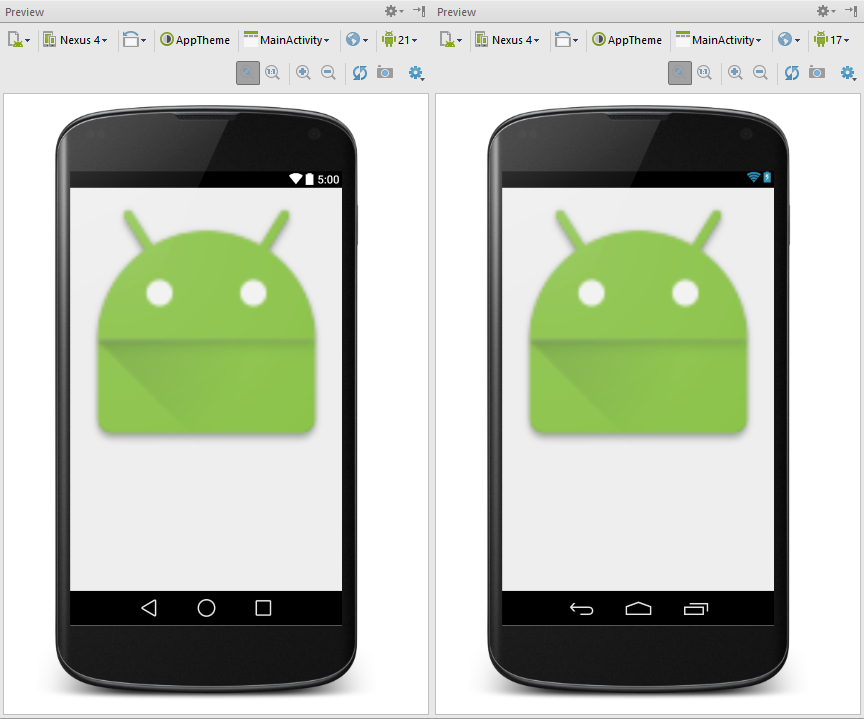
ทุกอย่างดูราบรื่นดี แต่พอสลับโหมด Preview มาที่ API Level ตั้งแต่ 17 ลงมา กลับพบว่า ImageView ไม่ขยายขนาดขึ้นตามที่ต้องการแล้ว
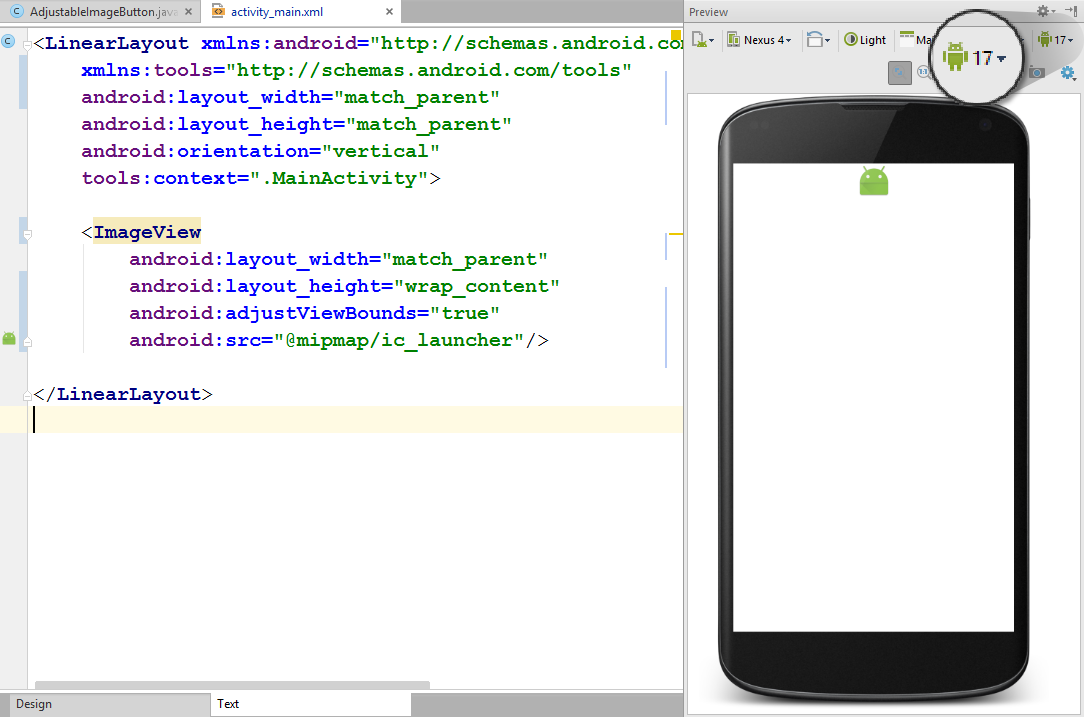
สาเหตุเพราะในเอกสารเขียนไว้ว่า
Note: If the application targets API level 17 or lower, adjustViewBounds will allow the drawable to shrink the view bounds, but not grow to fill available measured space in all cases. This is for compatibility with legacyMeasureSpecandRelativeLayoutbehavior.
นั่นคือใน API Level 17 หรือต่ำกว่า รูปจะไม่สามารถขยายให้ใหญ่เกินกว่าขนาดจริงของภาพได้ ในที่นี้ความสูงของ ImageView จึงถูกจำกัดไว้ที่ขนาดของภาพเท่านั้น จึงได้ผลอย่างที่เห็นด้านบน
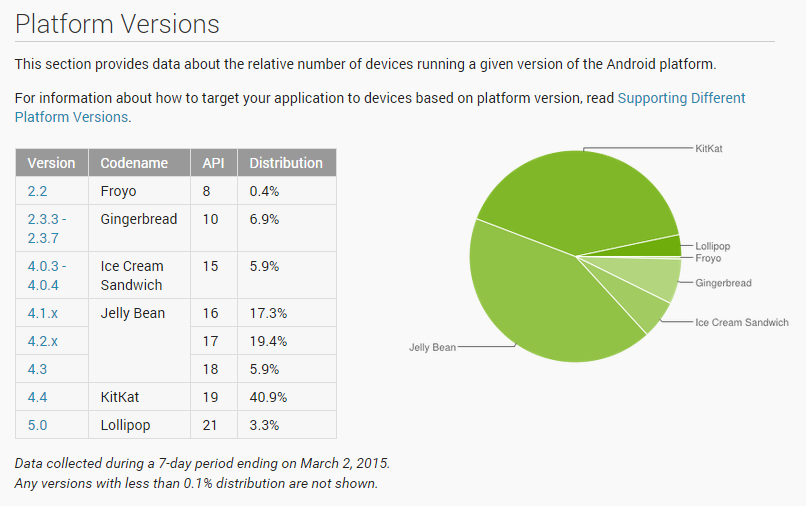
แต่เมื่อดู Market Share ของ Android เวอร์ชั่นต่างๆ จะพบว่า API Level 17 หรือต่ำกว่ายังครองตลาดอยู่ถึงเกือบ 50%
ดังนั้นการที่เราจะกำหนด minSdkVersion ให้เป็น 18 เพื่อหลบเลี่ยงปัญหานี้ก็คงไม่ใช่ทางแก้ที่ดีเท่าไหร่
เราจึงใช้วิธีการตรงกันข้ามในการแก้ปัญหานี้ ด้วยการเอา Behaviour ของ ImageView ตั้งแต่ API Level 18 เป็นต้นไปมาสร้างเป็น Custom ImageView ซะเลย เพื่อให้มันนำไปใช้ย้อนกลับได้ถึงแอนดรอยด์รุ่นแรก
และนี่คือโค้ดของ Custom ImageView ดังกล่าวครับ
import android.content.Context;
import android.graphics.drawable.Drawable;
import android.util.AttributeSet;
import android.view.ViewGroup;
import android.view.ViewParent;
import android.widget.ImageView;

/**
 * Created by nuuneoi on 2/17/15 AD.
 */
public class AdjustableImageView extends ImageView {

    boolean mAdjustViewBounds;

    public AdjustableImageView(Context context) {
        super(context);
    }

    public AdjustableImageView(Context context, AttributeSet attrs) {
        super(context, attrs);
    }

    public AdjustableImageView(Context context, AttributeSet attrs, int defStyleAttr) {
        super(context, attrs, defStyleAttr);
    }

    @Override
    public void setAdjustViewBounds(boolean adjustViewBounds) {
        mAdjustViewBounds = adjustViewBounds;
        super.setAdjustViewBounds(adjustViewBounds);
    }

    @Override
    protected void onMeasure(int widthMeasureSpec, int heightMeasureSpec) {
        Drawable mDrawable = getDrawable();
        if (mDrawable == null) {
            super.onMeasure(widthMeasureSpec, heightMeasureSpec);
            return;
        }

        if (mAdjustViewBounds) {
            int mDrawableWidth = mDrawable.getIntrinsicWidth();
            int mDrawableHeight = mDrawable.getIntrinsicHeight();
            int heightSize = MeasureSpec.getSize(heightMeasureSpec);
            int widthSize = MeasureSpec.getSize(widthMeasureSpec);
            int heightMode = MeasureSpec.getMode(heightMeasureSpec);
            int widthMode = MeasureSpec.getMode(widthMeasureSpec);

            if (heightMode == MeasureSpec.EXACTLY && widthMode != MeasureSpec.EXACTLY) {
                // Fixed Height & Adjustable Width
                int height = heightSize;
                int width = height * mDrawableWidth / mDrawableHeight;
                if (isInScrollingContainer())
                    setMeasuredDimension(width, height);
                else
                    setMeasuredDimension(Math.min(width, widthSize), Math.min(height, heightSize));
            } else if (widthMode == MeasureSpec.EXACTLY && heightMode != MeasureSpec.EXACTLY) {
                // Fixed Width & Adjustable Height
                int width = widthSize;
                int height = width * mDrawableHeight / mDrawableWidth;
                if (isInScrollingContainer())
                    setMeasuredDimension(width, height);
                else
                    setMeasuredDimension(Math.min(width, widthSize), Math.min(height, heightSize));
            } else {
                super.onMeasure(widthMeasureSpec, heightMeasureSpec);
            }
        } else {
            super.onMeasure(widthMeasureSpec, heightMeasureSpec);
        }
    }

    private boolean isInScrollingContainer() {
        ViewParent p = getParent();
        while (p != null && p instanceof ViewGroup) {
            if (((ViewGroup) p).shouldDelayChildPressedState()) {
                return true;
            }
            p = p.getParent();
        }
        return false;
    }
}
ตัวโค้ดมีหลักการง่ายๆคือในขั้นตอน onMeasure ให้คำนวณค่าความสูงตามอัตราส่วนของภาพในกรณีที่ความกว้างถูกกำหนดค่าไว้หรือในทางตรงกันข้าม คำนวณค่าความกว้างในกรณีที่ความสูงถูกกำหนดค่าไว้ และหาก AdjustableImageView ตัวนี้อยู่ใน Container ที่ไม่สามารถ Scroll ได้ ก็จะจำกัดความสูงหรือความกว้างให้เหลือเท่าที่สามารถแสดงผลได้ใน Parent เท่านั้น แต่ถ้า Scroll ได้ ก็ขยายขนาดเต็มที่ได้เลย
วิธีการนำไปใช้งานก็แค่เปลี่ยนไฟล์ Layout XML จาก ImageView ให้เป็นชื่อคลาสพร้อมแพคเกจของ AdjustableImageView เช่น
<com.inthecheesefactory.thecheeselibrary.widget.AdjustableImageView
    android:layout_width="match_parent"
    android:layout_height="wrap_content"
    android:adjustViewBounds="true"
    android:src="@mipmap/ic_launcher" />
เป็นอันเรียบร้อยครับ
ใช้งานง่ายๆด้วย AdjustableImageView Library
ไม่ต้องก็อปปี้โค้ดไปแปะเองในโปรเจคอีกต่อไปเพราะตอนนี้ AdjustableImageView และ AdjustableImageButton มีให้ใช้งานในรูปแบบของ Library Dependency บน jcenter แล้ว ทุกท่านสามารถนำไปใช้ทันที โดยสามารถดู Source Code ของ Library ตัวนี้ได้จาก AdjustableImageView Repository บน GitHub ครับ
ขั้นตอนง่ายๆ แค่เพียงเพิ่ม Dependency เข้าไปใน build.gradle ดังนี้
dependencies {
    compile 'com.inthecheesefactory.thecheeselibrary:adjustable-imageview:1.0.0'
}
เพียงเท่านี้คุณก็จะสามารถใช้งานได้ทั้ง AdjustableImageView และ AdjustableImageButton ทันที โดยทั้งคู่อยู่ในแพคเกจ com.inthecheesefactory.thecheeselibrary.widget.*
โดยการใช้งานก็สามารถใช้แทน ImageView และ ImageButton ได้เลยครับ ตัวอย่างการใช้งานดังนี้
<LinearLayout xmlns:android="http://schemas.android.com/apk/res/android"
    xmlns:tools="http://schemas.android.com/tools" android:layout_width="match_parent"
    android:layout_height="match_parent"
    android:orientation="vertical"
    tools:context=".MainActivity">

    <ScrollView
        android:layout_width="match_parent"
        android:layout_height="match_parent"
        android:fillViewport="true">

        <LinearLayout android:layout_width="match_parent"
            android:layout_height="match_parent"
            android:orientation="vertical">

            <com.inthecheesefactory.thecheeselibrary.widget.AdjustableImageView
                android:layout_width="match_parent"
                android:layout_height="wrap_content"
                android:adjustViewBounds="true"
                android:src="@mipmap/ic_launcher"/>

            <com.inthecheesefactory.thecheeselibrary.widget.AdjustableImageView
                android:layout_width="match_parent"
                android:layout_height="wrap_content"
                android:adjustViewBounds="true"
                android:src="@mipmap/ic_launcher"/>
        </LinearLayout>

    </ScrollView>

</LinearLayout>
คราวนี้ไม่ว่าจะแอนดรอยด์เวอร์ชั่นไหน ImageView และ ImageButton ก็สามารถแสดงผลได้อย่างที่ควรจะเป็นเรียบร้อยแล้วครับ
เหตุการณ์นี้เป็นตัวอย่างที่ดีถึงเหตุผลที่ว่าทำไมเราถึงไม่ควรลง SDK Platform แค่ตัวเวอร์ชั่นล่าสุดเท่านั้น แต่ควรลงตัวเก่าๆไว้ด้วย ก็เพื่อที่จะได้ดูว่าตอนพรีวิวจะเป็นยังไงนั่นเองครับ =) (การพรีวิว Layout ใน Android เวอร์ชั่นต่างๆ จำเป็นต้องลง SDK Platform ของเวอร์ชั่นนั้นๆด้วย มิฉะนั้นในหน้าจอ Preview จะไม่มีมาให้เลือกครับ)
 |
ผู้เขียน: nuuneoi (Android GDE, CTO & CEO at The Cheese Factory) นักพัฒนาแบบ Full-Stack ที่มีประสบการณ์ในการพัฒนาแอพฯแอนดรอยด์มากว่า 6 ปีและอยู่ในวงการพัฒนาแอพฯมือถือมากว่า 12 ปี มีความสนใจทางด้าน Infrastucture, Service Side, Design, UI&UX, Hardware, Optimization, Cooking, Photographing, Blogging, Training, Public Speaking และรักที่จะแชร์เรื่องราวให้ผู้คนได้อ่านได้ฟังกันผ่าน Blog
|