

In Android Studio, if you wish to include any library to your application. You could just simply add a following line of dependency in module's build.gradle file.
dependencies {
    compile 'com.inthecheesefactory.thecheeselibrary:fb-like:0.9.3'
}
That's all. The library is now usable.
It is completely cool. But you might be curious where does Android Studio fetch the library from? This blog will describe in details how this thing work including how to publish your own library and share it to developers in the rest of the world which does not only make this world a better place but also make you look more cool !
Where does Android Studio fetch the library from?
Start with this first simple question which I believe that not all of you completely knows that from where Android Studio fetch the library. Does it just search google for us and download the proper library to our project?
Well. It is not that complicated. Android Studio downloads the library from Maven Repository Server we defined in build.gradle. (Apache Maven is a tools developed by Apache provides a file server to distribute the libraries). Basically there are just 2 standard servers used for host the libraries for Android such as jcenter and Maven Central
jcenter
jcenter is a Maven Repository hosted by bintray.com. You could find the whole repository here.
To use jcenter in your project, you have to define the repository like below in project's build.gradle file.
allprojects {
    repositories {
        jcenter()
    }
}
Maven Central
Maven Central is a Maven Repository hosted by sonatype.org. You could find the whole repository here.
To use Maven Central in your project, you have to define the repository like below in project's build.gradle file.
allprojects {
    repositories {
        mavenCentral()
    }
}
Please note that although both jcenter and Maven Central are standard android library repositories but they are hosted at completely different place, provided by different provider and there is nothing related to each other. What that is available in jcenter might not be found in Maven Central and vice versa.
Apart from those two standard servers, we are also able to define the specific Maven Repository Server ourselves in case we use a library from some developers who want to host their libraries on their own server. Twitter's Fabric.io falls in this case by hosting their own Maven Repository at https://maven.fabric.io/public. If you want to use any Fabric.io's library, you have to define the repository's url yourselve like below.
repositories {
    maven { url 'https://maven.fabric.io/public' }
}
And then you will be able to access any library inside with the same method.
dependencies {
    compile 'com.crashlytics.sdk.android:crashlytics:2.2.4@aar'
}
But which one is the better: to upload library to standard server or to host our own server? The former is. To make our own library be available to public. Another developer should not has to define anything but a line of code defining dependency's name. So in this article, we will focus on just jcenter and Maven Central which provide far better experience for developer.
FYI actually there is another type of repository besides Maven Repository that works with gradle on Android Studio. It is called Ivy Repository but from my own experience, I have never seen anyone using it before including me so I will just simply ignore this type of repository in this article.
Understand jcenter and Maven Central
Wonder why is there not only just one but two standard repositories out there?
Actually both of them are the repositories having the same duty: hosting Java/Android libraries. It is a developers' choice to upload their libraries to which one or may be both.
At first, Android Studio chose Maven Central as a default repository. Once you create a new project from old version of Android Studio, mavenCentral() would be automatically defined in build.gradle.
But the big problem of Maven Central is it is not developer-friendly. It is surprisingly hard to upload the library to. To be able to do so, developer has to be at some level of geeky. And with some more reason for example a security concern and etc, Android Studio team decided to switch the default repository to jcenter instead as you can see that once you create a new project from latest version of Android Studio, jcenter() would be automatically defined instead of mavenCentral().
There are load of good reasons why they decided to switch from Maven Central to jcenter. Here are some of the major one.
- jcenter delivers library through CDN which means that developer could enjoy the faster loading experience.
- jcenter is the largest Java Repository on earth. So whatever that is available on Maven Central could be implied that it would be available on jcenter as well. In the other words, jcenter is superset of Maven Central.
- It is incredibly easy to upload our own library to the repository. No need to sign or do any complex thing like we have to on Maven Central.
- Friendly-UI
- If you want to upload your library to Maven Central you could do it easily with a single click on bintray site (and with some step of one-time setup).
With above reasons and from my own experiences, I must say that it is the brilliant decision switching default repository to jcenter.
So this article will focus on just jcenter since once you successfully upload your library to jcenter, it could be forwarded to Maven Central easily after that.
How does gradle pull a library from Repository?
Before we start talking about how to upload a library to jcenter. We should start with how gradle fetch a library from repository. For example, when we type like below in build.gradle, how are those library files magically downloaded to your project.
compile 'com.inthecheesefactory.thecheeselibrary:fb-like:0.9.3'Basically we have to know the form of library string first. It consists of 3 parts:
GROUP_ID:ARTIFACT_ID:VERSIONIn the above case, GROUP_ID is com.inthecheesefactory.thecheeselibrary while ARTIFACT_ID is fb-like and VERSION is 0.9.3
For the meaning, GROUP_ID defines the name of library's group. It is possible that there would be more than one library that work the different job in the same context. If library are in the same group, it would share the same GROUP_ID. Generally we name it with developer's package name and then follow with the name of library's group, for example, com.squareup.picasso. And then defines the real name of the library in ARTIFACT_ID. For VERSION, there is nothing but a version number. Although it could be any text but I suggest to set it in x.y.z format and might follow with -beta if you want.
Here is the real example of library from Square. You will notice that each one could be easily recognised the library's and developer's name.
dependencies {
  compile 'com.squareup:otto:1.3.7'
  compile 'com.squareup.picasso:picasso:2.5.2'
  compile 'com.squareup.okhttp:okhttp:2.4.0'
  compile 'com.squareup.retrofit:retrofit:1.9.0'
}
What will happen when we add dependencies like above? Easy. Gradle will ask Maven Repository Server that does the library exist if yes gradle will get a path of the requested library which mostly in the form of GROUP_ID/ARTIFACT_ID/VERSION_ID, for example, you could find library files of com.squareup:otto:1.3.7 from http://jcenter.bintray.com/com/squareup/otto/1.3.7 and https://oss.sonatype.org/content/repositories/releases/com/squareup/otto/1.3.7/.
And then Android Studio would download those files to our machine and compile with our project per your request. That's all. Nothing complicated !
I believe that you should know understand clearly that library pulled from repository is nothing special but jar or aar files hosted on repository server. It could be compared just like to download those files yourselve, copy and compile everything along with your project. But the big benefits you get from dependency system available on gradle is you don't have to do anything but just type some texts and that's all. The library would suddenly be useable in your project also with versioning system.
Knowing an aar file format
Wait ... I said that there are two types of library files that could be hosted on the repository, jar and aar. jar file is nothing, I believe that all of you know about it. But what is aar file exactly?
aar file is developed on top of jar file. It was invented because something Android Library needs to be embedded with some Android-specific files like AndroidManifest.xml, Resources, Assets or JNI which are out of jar file's standard. So aar was invented to cover all of those things. Basically it is a normal zip file just like jar one but with different file structure. jar file is embedded inside aar file with classes.jar name. And the rest are listed below:
- /AndroidManifest.xml (mandatory)
- /classes.jar (mandatory)
- /res/ (mandatory)
- /R.txt (mandatory)
- /assets/ (optional)
- /libs/*.jar (optional)
- /jni/<abi>/*.so (optional)
- /proguard.txt (optional)
- /lint.jar (optional)
As you can see. aar file is designed for Android especially. So this article will teach you how to create and upload a library in aar format.
How to upload your library to jcenter
Right now I believe that you already have all of the basic knowledge on how the repository system works. Now let's begin the most important part: uploading processes. The objective is as simple as how to upload our library files to http://jcenter.bintray.com. Once we could do it, the library is published. Well ... two things to concern: how to create an aar file and how to upload built files to the repository?
Although it requires a bunch of steps but I must say that it is totally not hard thing to do since bintray has prepared for everything quite well. You could find the whole process in the below diagram.
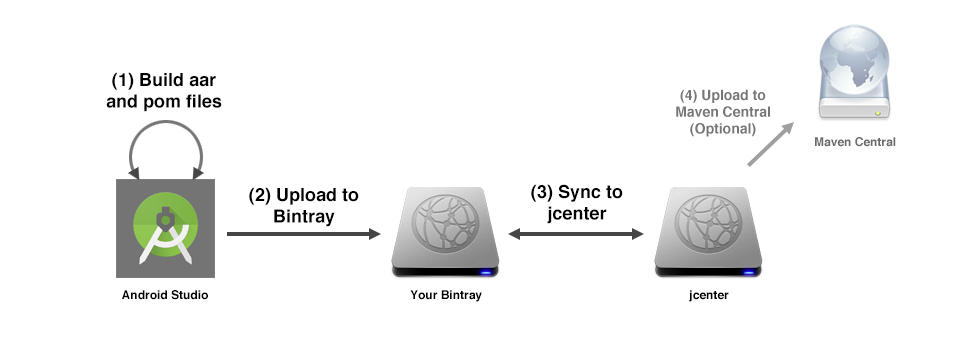
And since there are quite a lot of details so let me split the process to 7 parts so I could describe everything clearly in step-by-step.
Part 1 : Create a package on Bintray
First of all. You need to create a package on bintray. To do so, you need a bintray account and create a package on website.
Step 1: Register for an account on bintray.com. (The sign up process is quite simple so please do it yourself)
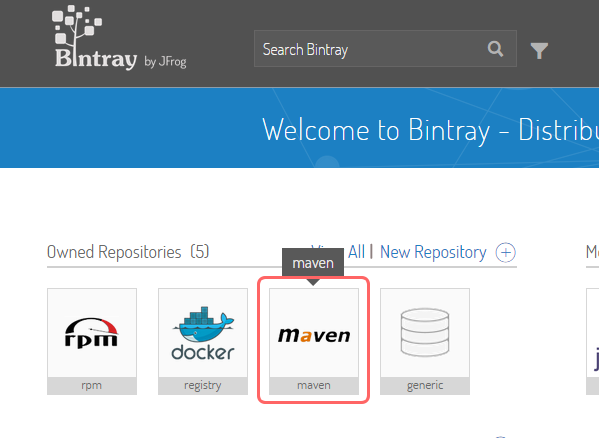
Step 2: Once registration is done, login to the website and click at maven
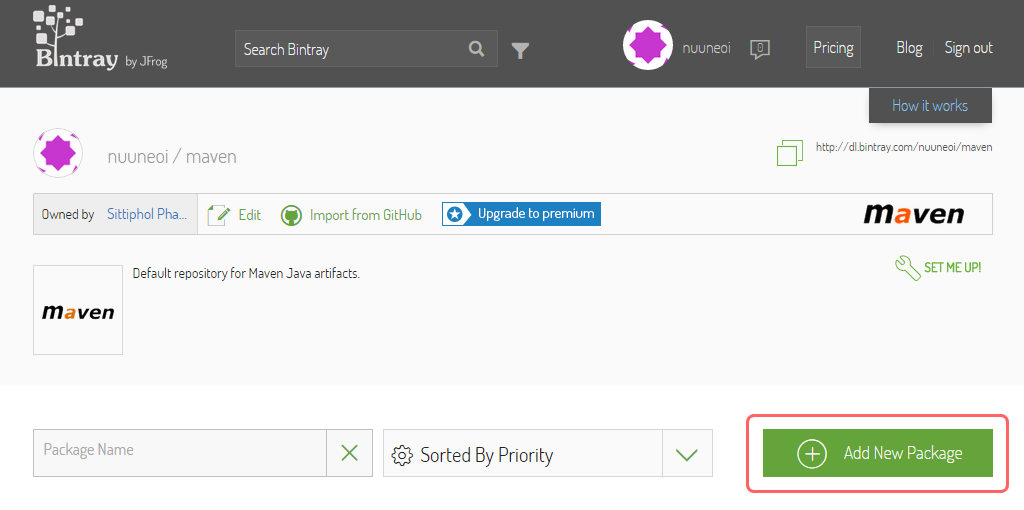
Step 3: Click at Add New Package to start creating a new package for our library.
Step 4: Enter all of those required information
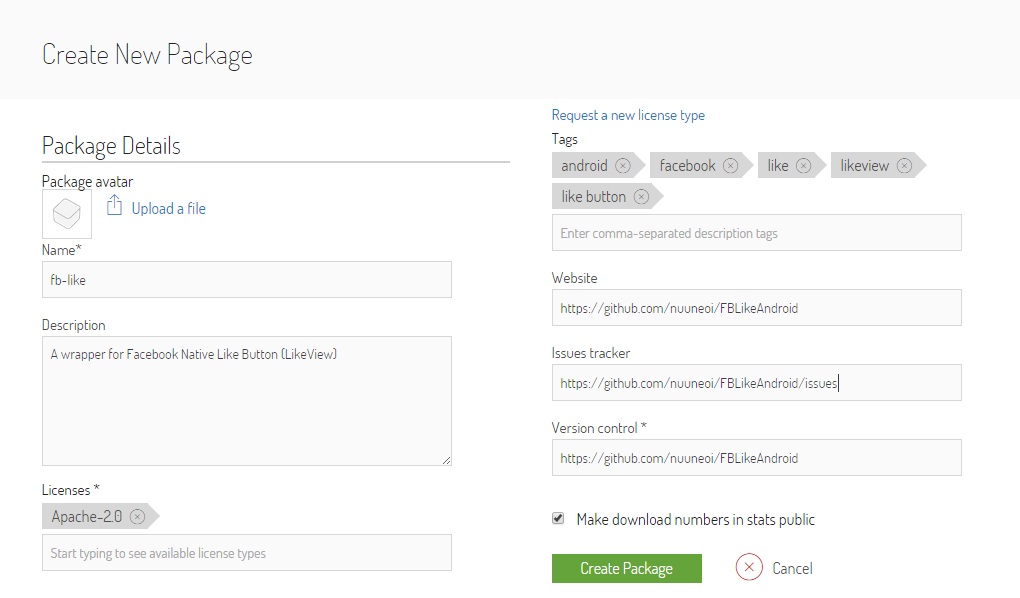
Although there is no rule on how to name the Package Name but there is some name convention. Just set all of the characters to lowercase and separate each word with hyphen (-), for example, fb-like.
Once every required fields are done, click at Create Package to finish.
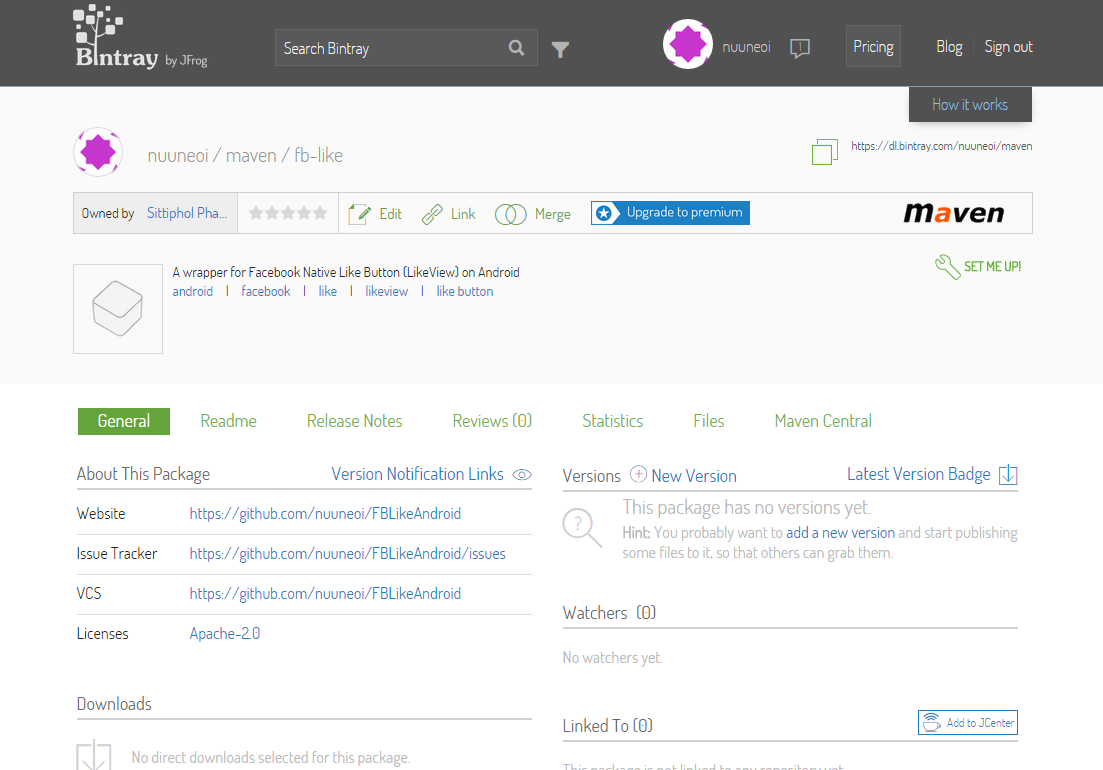
Step 5: Website will redirect you to Edit Package page. Click at package's name under Edit Package text to enter package's details page.

Done! You now have your own Maven Repository on Bintray which is ready to be uploaded the library to.
Bintray account registration is now done. Next one to work with is Sonatype, the Maven Central provider.
Part 2 : Create a Sonatype account for Maven Central
Note: You could skip Part 2 and 3 if you don't have a plan to upload your library to Maven Central. Anyway I suggest you not to skip since there are a lot of developers out there who still use this repository.
Just like jcenter, if you want to distribute your library through Maven Central, you need to register an account at its provider site, Sonatype.
What you need to know is the account that you have to create one is the JIRA Issue Tracker account on Sonatype site. To do so, please go to Sonatype Dashboard and simply sign up for an account.
Once you're done. You have to request a permission to distribute your library to Maven Central. Anyway the process doesn't make any sense at all (at least for me) since what you have to do is to create an issue in JIRA to let them allow you to upload your library that match the GROUP_ID provided to Maven Central.
To create an issue like described, go to Sonatype Dashboard and login with account created. And then click at Create placed at the top menu.
Fill in the following information:
Project: Community Support - Open Source Project Repository Hosting
Issue Type: New Project
Summary: Your library's name in summary, for example, The Cheese Library
Group Id: Put the root GROUP_ID, for example, com.inthecheeselibrary . After you got an approval, every single library starts with com.inthecheeselibrary will be allowed to upload to repository, for example, com.inthecheeselibrary.somelib
Project URL: Put a URL of any library you plan to distribute, for example, https://github.com/nuuneoi/FBLikeAndroid
SCM URL: URL of Source Control, for example, https://github.com/nuuneoi/FBLikeAndroid.git
Keep the rest unmodified and click at Create. That's all. Now it is the hardest part ... wait patiently ... which will take around 1 week or a little bit more by average. And you will be granted an access to distribute your library to Maven Central after that.
The last thing to do is to give bintray your Sonatype OSS username in Accounts tab of Bintray Profile.
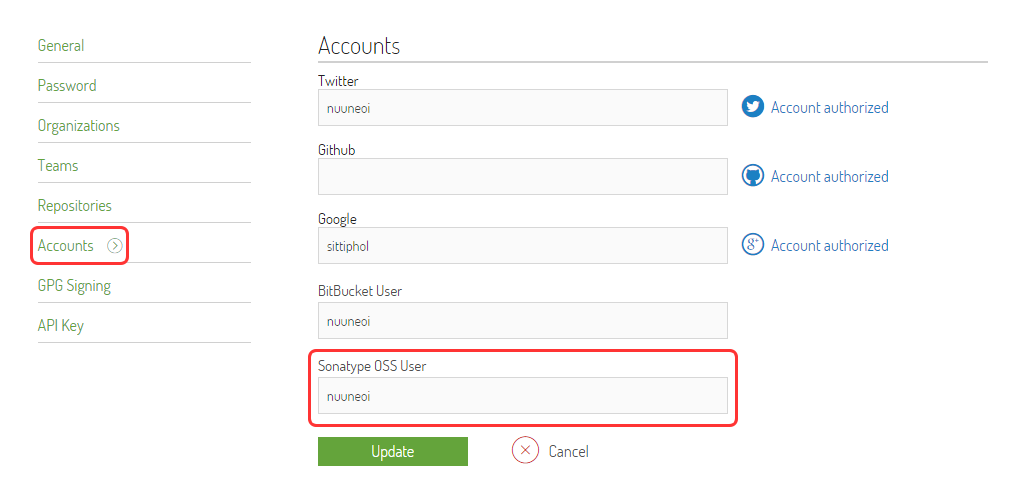
Click at Update and we're done.
Part 3 : Enable Auto Signing in Bintray
As mentioned above, we could upload a library to Maven Central through jcenter but to do that we need to sign that library first. bintray provides a mechanic to do that easily through web interface that allows library to be signed automatically once uploaded.
First step is to generate a key via command line with the command below. (In case you use Windows, please do it under cygwin)
gpg --gen-keyThere are some mandatory fields to be filled in. Default value could be applied in most of the parts but for some field you need to enter the proper value by yourself, for example, your real name, passpharse and etc.
Once key is created. Call the following command to see the created key's information.
gpg --list-keysIf there is nothing wrong, the information will be shown as below
pub   2048R/01ABCDEF 2015-03-07
uid                  Sittiphol Phanvilai <[email protected]>
sub   2048R/98765432 2015-03-07
Now we have to upload the public key to keyservers to make it useful. To do so, please call the following command and replace PUBLIC_KEY_ID with 8-digits hexadecimal value after 2048R/ in the pub line which is 01ABCDEF in this example.
gpg --keyserver hkp://pool.sks-keyservers.net --send-keys PUBLIC_KEY_IDAnd then, export both public and private key as ASCII armor format with the following command and please replace [email protected] to the email you used to create your own key in the previous step.
gpg -a --export [email protected] > public_key_sender.asc
gpg -a --export-secret-key [email protected] > private_key_sender.asc
Open Bintray's Edit Profile page and click at GPG Signing. Fill in both Public Key and Private Key using content in public_key_sender.asc and private_key_sender.asc files exported in previous step respectively.
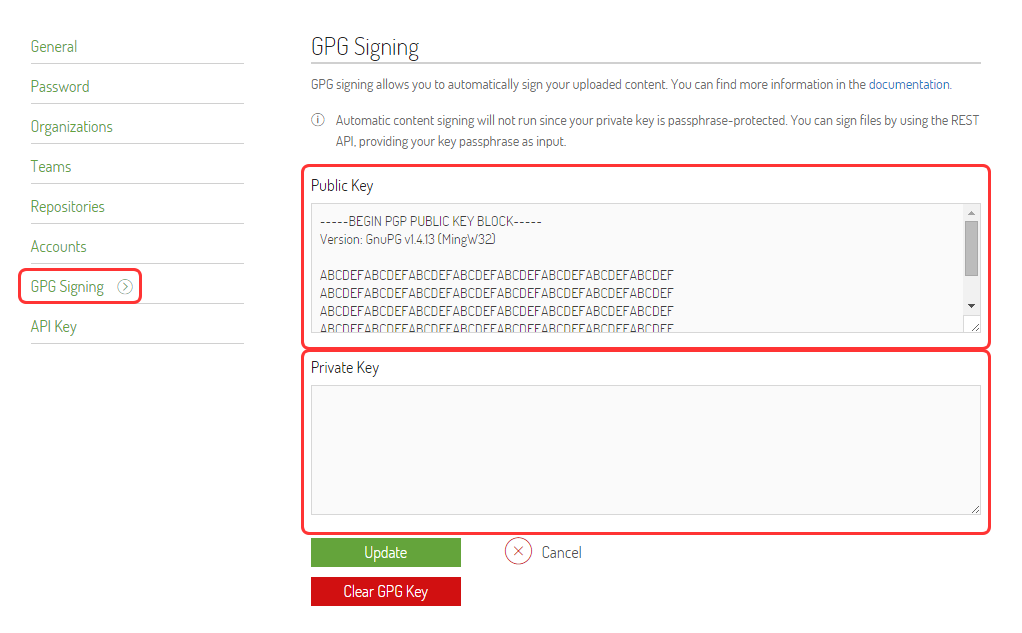
Click at Update to save the keys
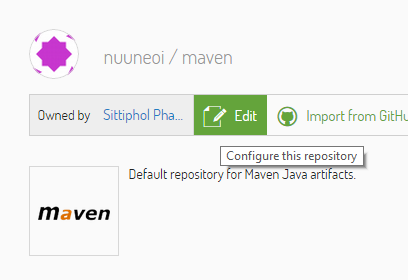
The final step is to enable auto signing. Go to main page of Bintray and then click at maven.
Click Edit
Check the GPG Sign uploaed files automatically box to enable auto signing.
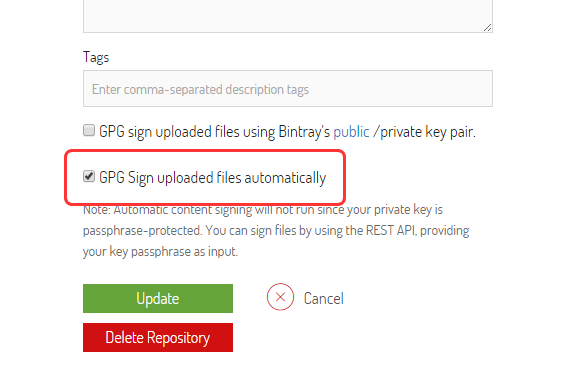
Click Update to save the progress. That's all. From now on, every single library uploaded to our Maven Repository will be automatically signed and is ready to be forwarded to Maven Central in a single click.
Please note that this is a one-time action and would be also applied to every single library created after this.
Bintray and Maven Central are now prepared. Now let's switch to Android Studio part.
Part 4 : Prepare an Android Studio project
In many cases, we might need more than 1 library to be uploaded to repository in the single project and at the same time, we might not need to upload something as well. So the best structure I would recommend is to split each part as Module. Basically I suggest you to split to at least 2 modules, one Application Module for library usage example and another one is a Library Module contains the source code of library that you wish to upload to repository. Please note that if you want to have more than 1 library in your project, please feel free to create another module: 1 module per 1 library.
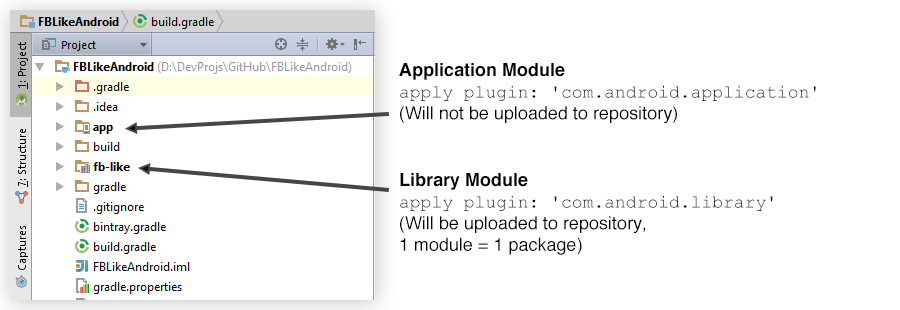
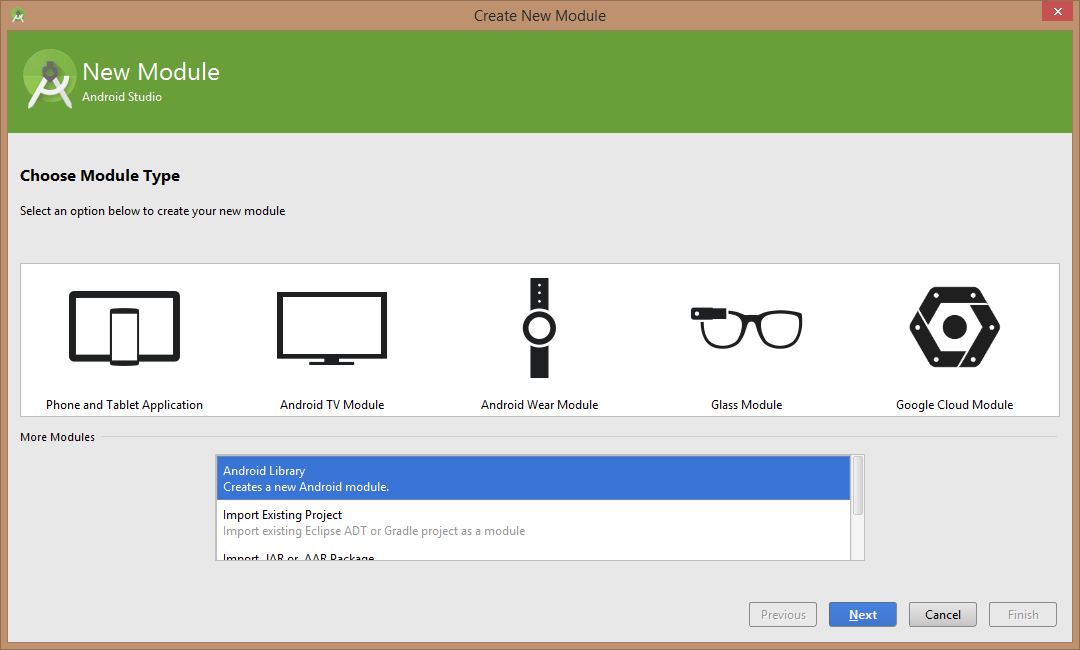
I believe that all of you know how to create a library module so I will not talk to deep in this part. It is just as simply as creating an Android Library module and it's done.
Next is to apply bintray's plugin to your project. To do that, we need to modify project's build.gradle file in dependencies part like this.
    dependencies {
        classpath 'com.android.tools.build:gradle:1.2.3'
        classpath 'com.jfrog.bintray.gradle:gradle-bintray-plugin:1.4'
        classpath 'com.github.dcendents:android-maven-gradle-plugin:1.3'
    }
It is important to set gradle build tools' version to 1.1.2 or upper since there is a critical bug in the prior versions. In this example, we will use the latest version, 1.2.3.
Next we will define the username and api key used for bintray authentication and also the password of created key by modifying local.properties. The reason that we need to put those things in this file is those information are sensitive and should not be shared to anywhere including version control. Fortunate that local.properties file is already added to .gitignore since project was created. So these sensitive data would not be uploaded to git server unintentionally.
Here is the three lines to add:
bintray.user=YOUR_BINTRAY_USERNAME
bintray.apikey=YOUR_BINTRAY_API_KEY
bintray.gpg.password=YOUR_GPG_PASSWORD
Put your bintray username in the first line and put the API Key which you could find yours at API Key tab in Edit Profile page in the second line.
The last line is the passphrase you used to create GPG key in previous step. Save and close the file.
The last file to be modified is module's build.gradle file. Open it and put these lines right after apply plugin: 'com.android.library' like this.
apply plugin: 'com.android.library'

ext {
    bintrayRepo = 'maven'
    bintrayName = 'fb-like'

    publishedGroupId = 'com.inthecheesefactory.thecheeselibrary'
    libraryName = 'FBLike'
    artifact = 'fb-like'

    libraryDescription = 'A wrapper for Facebook Native Like Button (LikeView) on Android'

    siteUrl = 'https://github.com/nuuneoi/FBLikeAndroid'
    gitUrl = 'https://github.com/nuuneoi/FBLikeAndroid.git'

    libraryVersion = '0.9.3'

    developerId = 'nuuneoi'
    developerName = 'Sittiphol Phanvilai'
    developerEmail = '[email protected]'

    licenseName = 'The Apache Software License, Version 2.0'
    licenseUrl = 'http://www.apache.org/licenses/LICENSE-2.0.txt'
    allLicenses = ["Apache-2.0"]
}
Leave bintrayRepo as it currently is, maven. Change bintrayName to your package name created above. And also change the rest to match your library's information. From the above script, everyone would be able to use this library with a following line of gradle script.
compile 'com.inthecheesefactory.thecheeselibrary:fb-like:0.9.3'Final step is to apply two scripts, used for building library files and uploading the built files to bintray, by appending the same build.gradle file with the following script at the end of the file. (I use the direct link to file hosted on github for convenience)
// Place it at the end of the file
apply from: 'https://raw.githubusercontent.com/nuuneoi/JCenter/master/installv1.gradle'
apply from: 'https://raw.githubusercontent.com/nuuneoi/JCenter/master/bintrayv1.gradle'
Done! Your project is now set and is ready to be uploaded to bintray. Yah !
Part 5 : Upload library to your bintray space
Now it's time to upload your library to your own repository on bintray. To do that, please go to Terminal tab on Android Studio.
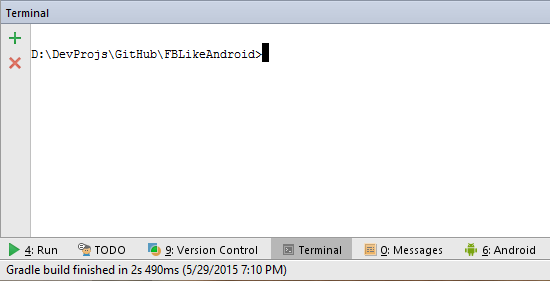
First step is to check the correctness of code and build the library files (aar, pom, etc.). Type the below command to do so.
> gradlew installIf these is nothing wrong, it would show something like:
BUILD SUCCESSFULWe are now halfway there. Next step is to upload the built files to bintray with following command.
> gradlew bintrayUpload
Say eureka loudly if it shows like below !
SUCCESSFULCheck your package in the bintray web interface. You will see a change in Versions area.
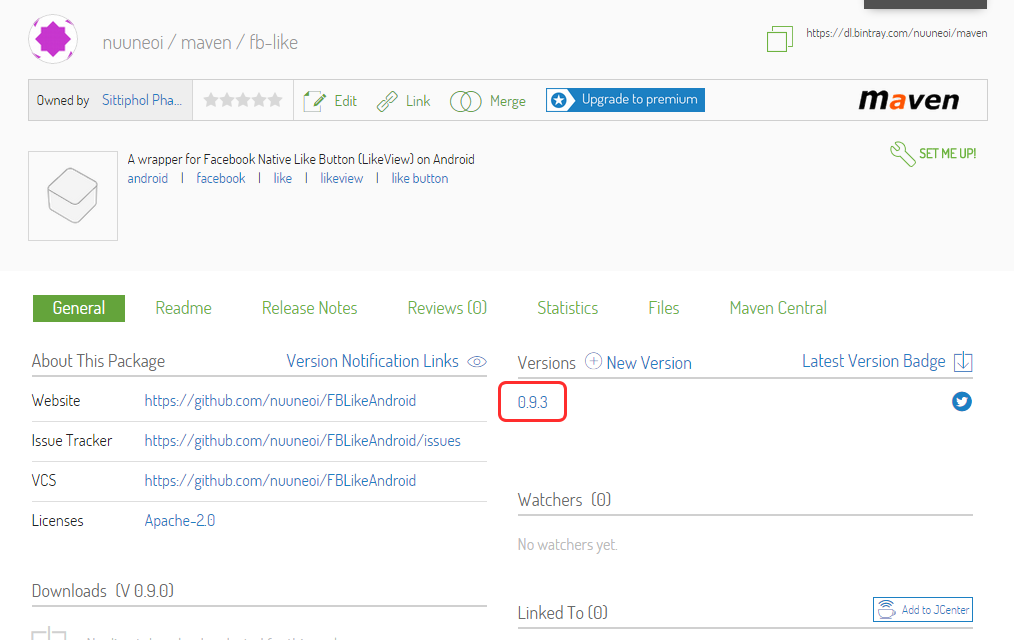
Click into it and look into Files tab and you will see the of uploaded library files placed right there.
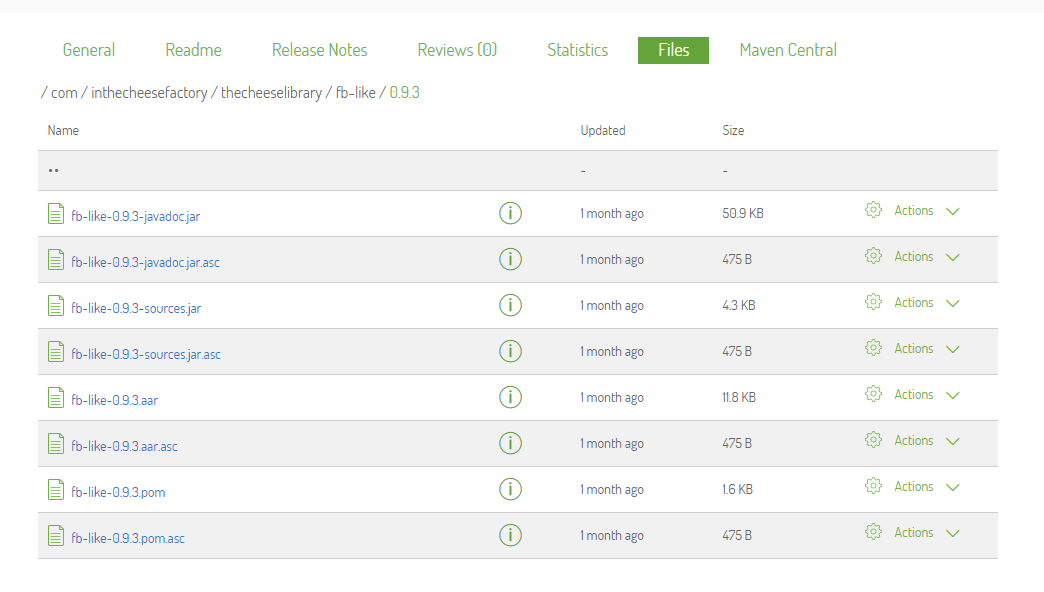
Congratulations, your library is now online and is ready for anyone to use it !
However don't too happy ... just yet. The library is still on your own Maven Repository not on jcenter yet. If anyone want to use your library, they have to define the repository's url first like below.
repositories {
    maven {
        url 'https://dl.bintray.com/nuuneoi/maven/'
    }
}

...

dependencies {
    compile 'com.inthecheesefactory.thecheeselibrary:fb-like:0.9.3'
}
You could find the url of your own Maven Repository from bintray web interface or just simply replace nuuneoi with your bintray username. I encourage you to try browsing into that link as well and you will see what exactly is going on.
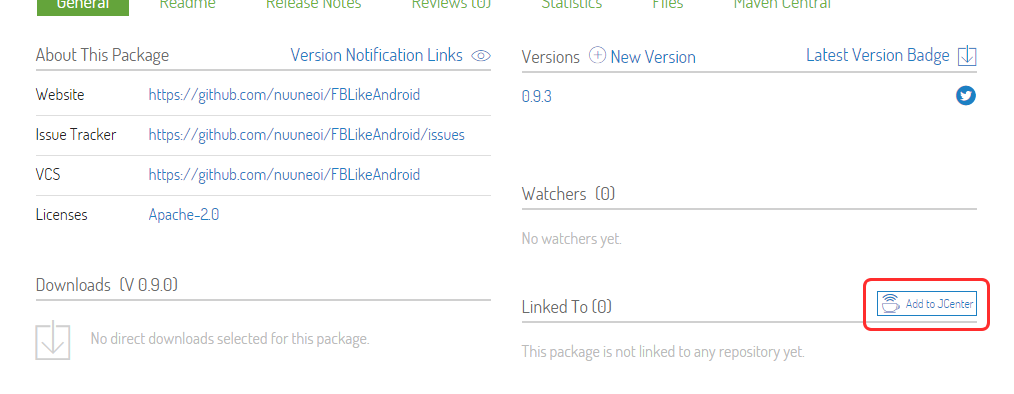
As mentioned above, it is not the best practices for shared library to let developer defines the complex things like this. Imagine, we have to add 10 urls to use 10 libraries? ... Nightmare ... So let's pass our library from our own repository to jcenter for the better life quality !
Part 6 : Sync bintray user repository to jcenter
It is pretty easy to sync your library to jcenter. Just go to the web interface and simply click at Add to JCenter
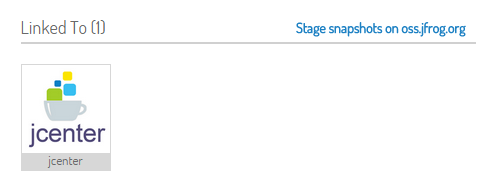
Nothing to do but click Send

Nothing we can do now but wait for 2-3 hours to let bintray team approves our request. Once sync request is approved, you will receive an email informing you the change. Now let's check the web interface, you will see some change in Linked To section.
From now on, any developer that use jcenter() repository will be able to use our library with a single line of gradle script.
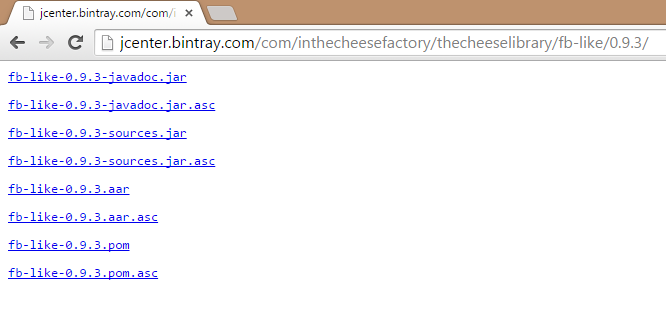
compile 'com.inthecheesefactory.thecheeselibrary:fb-like:0.9.3'Want to check the existence of your library binary in jcenter? You could do that by go to http://jcenter.bintray.com and browse into the directory matched your library's group id and artifact id. In this example, it would be com -> inthecheesefactory -> thecheeselibrary -> fb-like -> 0.9.3
Please note that linking to jcenter is a one-time action. From now on, if you do any modification in your package, for example, upload new version binary, delete old version binary, etc. The change would affect to jcenter as well. Anyway since your own repository and jcenter are at the different place so you may need to wait for around 2-3 minutes to let jcenter sync the change.
And please be careful. If you decide to remove the whole package, library files placed on jcenter repository would not be deleted in this case. And they will be left just like zombie files which nobody could delete it anymore. So I suggest you that if you want to delete the whole package, please delete every single version from web interface first before removing the package.
Part 7 : Forward library to Maven Central
Not all of android developers use jcenter. There are still a number of developers who still use mavenCentral() so let's upload our library to Maven Central as well.
To forward library from jcenter to Maven Central, there are two missions that you need to achieve first:
1) Bintray package must be already linked to jcenter
2) Repository on Maven Central has already been approved to open
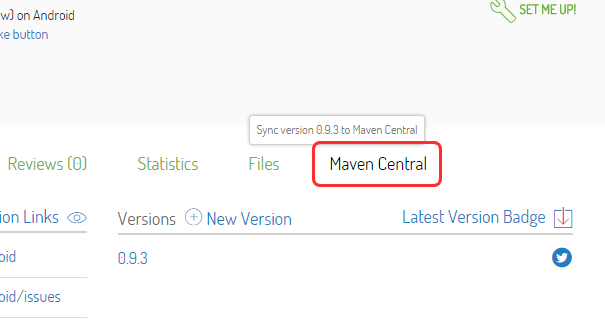
If you have already passed those qualifications. The way to forward your library package to Maven Central is incredibly easy. Just simply click at Maven Central link on package's details page.
Enter your Sonatype username/password and click Sync.
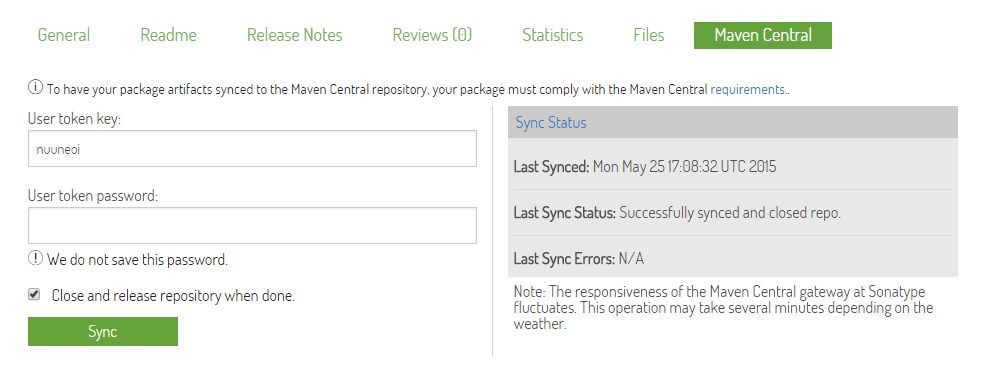
Successfully synced and closed repo would be shown in Last Sync Status once it's done successfully. But if there is any problem, it would be shown in Last Sync Errors. You have to fix the problem case by case since the condition of library that could be uploaded to Maven Central is quite strict, for example, + sign couldn't be used in the version of library's dependency definition.
Once done. You could find your library binaries in Maven Central Repository at the directory matched your library's group/artifact id. In this example, it is com -> inthecheesefactory -> thecheeselibrary -> fb-like -> 0.9.3
Congratulations ! That's all. Although it requires quite a lot of steps but steps are quite straightforward. And most of them are one-time action. Once things are set, you almost have to do any additional step after that.
Such a long article but hope that you find it useful. My English might be a little bit weird right now. But at least, I expect that contents are apprehensible.
Wish to see your great library up there ! Cheers. =)
 |
Author: nuuneoi (Android GDE, CTO & CEO at The Cheese Factory) A full-stack developer with more than 6 years experience on Android Application Development and more than 12 years in Mobile Application Development industry. Also has skill in Infrastucture, Service Side, Design, UI&UX, Hardware, Optimization, Cooking, Photographing, Blogging, Training, Public Speaking and do love to share things to people in the world!
|