

Yesterday I got a question: "In the end, there will be ton of library modules placed inside the android project. What is the best and sustainable way to organize these libraries for both current and future uses?".
Well, I think the question was quite great and I believe that many of you might have the same doubtfulness in mind so I decide to write this blog giving you an instruction how to "setup your own Private Maven Repository" for the internal use.
Let's get started.
Why should we setup a Private Maven Repository?
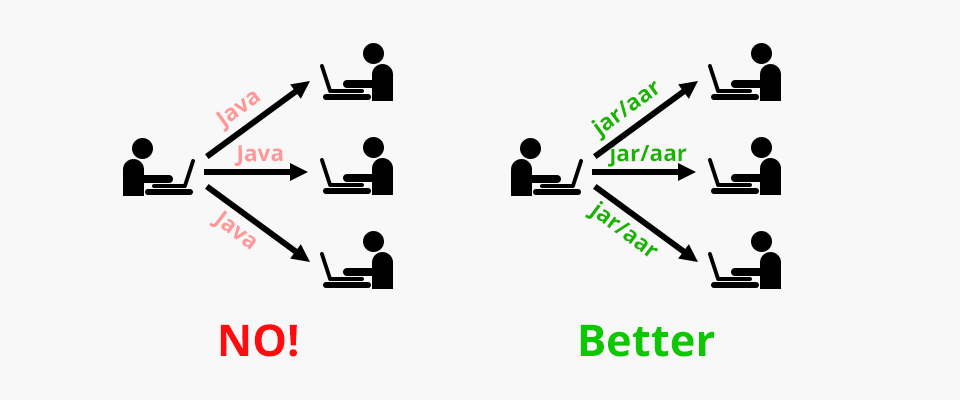
It's true that an Android Library module is actually just a bunch of source codes grouped in the same directory. If you want to let other developers use your library, you could simply send them the whole directory and let them include it in their project.
Sounds easy but it doesn't mean it is good. The question is "If company starts to grow and amount of project starts to increase continously. Is it good if we still pass the library as source code like this?"
The answer is a very big NO. Don't do that ! Here are some big reasons you need to concern:
1) Let's imagine. If you have about 10 projects sharing the same library module. At the final, you will find copies of source code scattering around in those projects which is totally not good for code controlling.
2) It's quite not convenient to update library to the newer version. Here is the process: download the source code, copy it, replace the old one with the new one, check if there is something wrong, etc... And you have to do every single step manually.
3) And if your day is bad enough, the updated version of library may cause your has-ever-worked-great-before application into the junky state. In that case, you need to roll the library back to the previous version. Wahhhh, that means we need to keep every single version of source code as a backup in case we might meet the jackpot someday.
4) In term of usage, we need to distribute the library to let other developers "use" it. So there is no need to let them see the source code. Just a legible document how to use the library is more than enough.
5) Library distributed to other developers should not be modifiable. In case there is some problem, issue should be reported to developer involved to let them fix. Letting other developers directly access the source code might cause them accidentally doing a quick fix by themselves which will cause a big problem afterwards.
And that's the reason why we shouldn't ever distribute the library as source code. The better way is to distribute the built-version of library instead which is .jar or .aar file in this case.
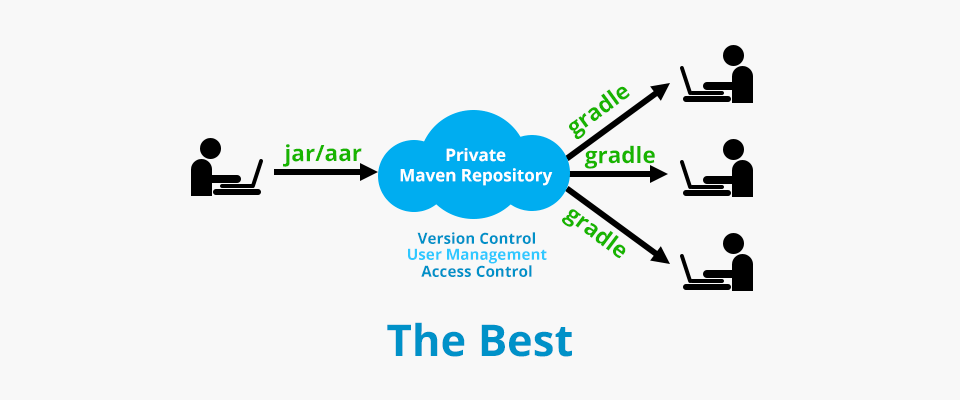
Although it looks better but it's not perfect yet. Most of the problem listed above are solved except one: it's still hard to update and roll back over the version. We still need to download, copy, replace, backup, blah blah blah. Developer's time is valueable and shouldn't be wasted from these things.
Is it better if we could just add a line of code in build.gradle's dependencies area just like we do to include the 3rd party library, for example,
compile 'my.company:library:1.1.0'If you have any problem with the new version of library, you could just simply change the version number back to the worked one in a second.
compile 'my.company:library:1.0.0'I found this as the perfect choice in every single dimension. It's easy to distribute the library, if you want to use, just add a line of code and done! It's also very easy to update and roll back to whichever version you want. And the source code is also unmodifiable.
So I encourage every company to have a Maven Repository to use internally for this. And since we use it internally then these libraries should be kept private, so Public Repository is not a choice. We must go for a Private Maven Repository with full access control system so that there will be nobody except team members gain an access to the library.
To achieve that, we have two choices:
1) To use private repository hosted service - There are quite a lot service like this out there. The most popular one are Bintray Premium and JitPack Private Repositories. Anyway it's quite pricey (at least for me). Moreover you will be charged more by the number of library artifact you need to host there. For me, it's not a good choice for the long term usage which amount of library artifact may increase to 10 within a year.
2) Setup your own dedicated server - There are so many choices of Open Source software providing you the perfect solution, for example, Artifactory and Nexus. You could put as many library artifacts as you want. Only bill you have to pay is the hosting fee which is not a big concern anymore these days. With DigitalOcean, you can pay just $10/month. That's all. Sounds cool, right?
Alright, I will give you an instruction how to set up our own Private Maven Repository as a dedicated server. The open source software I choose is Artifactory since it is incredibly easy to install despite its countless promising features and its stability.
Artifactory Installation
I know that you all must have your own favorite operating system in mind but to make it easy, let me control the hosting environment a little bit. In this blog entry, I will guide you how to setup Artifactory on Ubuntu 14.04 LTS on DigitalOcean. If you don't want to pay any buck, VM on VirtualBox might be a choice for you as well. Choose one, it's your choice.
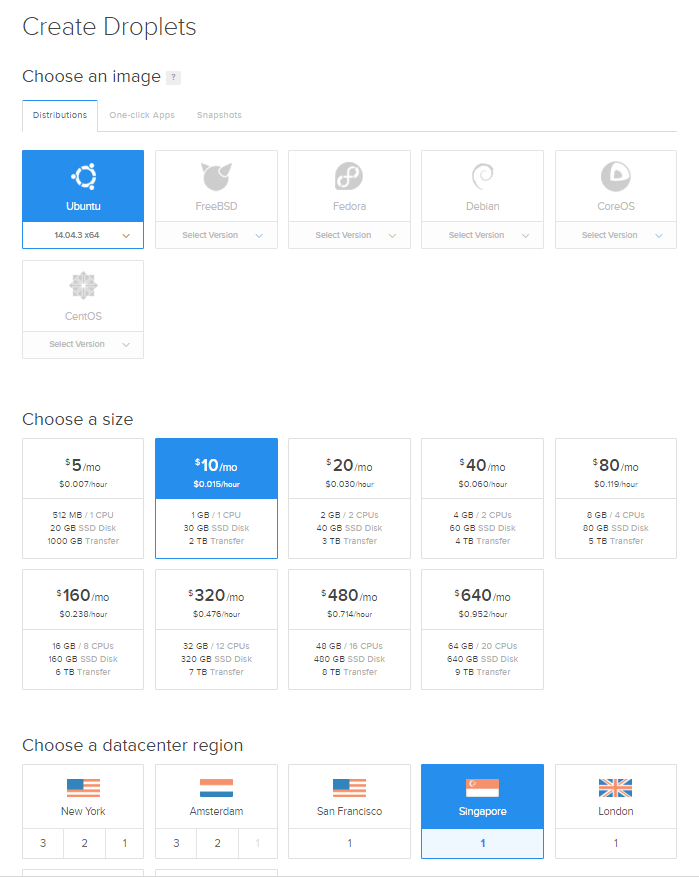
Create Ubuntu 14.04 LTS droplet
Initially, let's create an droplet on DigitalOcean with these specifications:
OS: Ubuntu 14.04 LTS
Size: $10/month
Region: Any region but I recommend you to choose the server closed to you most.
After droplet is created, please ssh into the created server with root user and password sent to your email.
Install Java 8
Java 8 doesn't come with Ubuntu 14.04 LTS' default repository. We need to install it through PPA repository. You can do so with these command lines:
# add-apt-repository ppa:webupd8team/java
# apt-get update
# apt-get install oracle-java8-installer
You could verify the installation by typing this command.
# java -version
java version "1.8.0_72"
Java(TM) SE Runtime Environment (build 1.8.0_72-b15)
Java HotSpot(TM) 64-Bit Server VM (build 25.72-b15, mixed mode)
Done.
Install Artifactory
Installation is easy. First, you need to download the debian package of Artifactory from bintray:
$ wget https://bintray.com/artifact/download/jfrog/artifactory-debs/pool/main/j/jfrog-artifactory-oss-deb/jfrog-artifactory-oss-4.5.1.debVersion used in this tutorial is 4.5.1 since it is the latest version at the moment I write this blog entry. Feel free to use any other version you prefer. A list of Artifactory version number is available in Bintray site.
Now it's time to install it with these 4 line of codes. And of course, if you use another version besides 4.5.1, don't forget to change the number of deb package to what you are using.
$ gpg --keyserver pgpkeys.mit.edu --recv-key 6B219DCCD7639232
$ gpg -a --export 6B219DCCD7639232 | sudo apt-key add -
$ apt-get update
$ dpkg -i jfrog-artifactory-oss-4.5.1.deb
Installation will be done in a minute. You could start the service immediately with this command.
# service artifactory startTomcat is already embedded in Artifactory package so you have no need to install anything else. It is now ready to use as a standalone.
Configure Artifactory
Open your preferred browser and browse to this url: http://IPADDRESS:8081/artifactory/ (replace IPADDRESS with your server's IP Address). You will see the login screen like this:
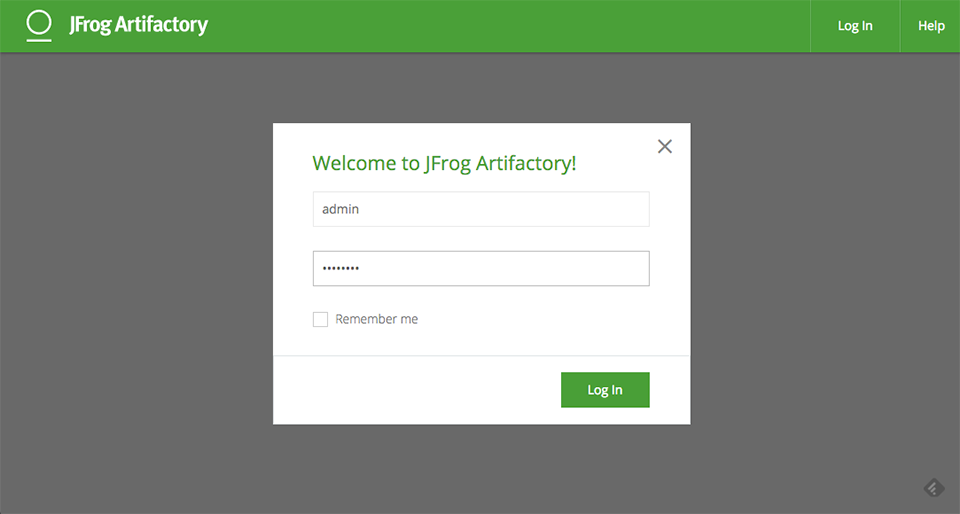
Login with Username: admin and Password: password
The first thing I suggest you to do immediately after logged in is to change your admin password to prevent furthur security issue. To do so, browse to Admin -> Security -> Users -> admin change the password to what your want.

Anyway we shouldn't work with the library as admin. So we will leave the account like this and create a new one instead. Here is how to do it step-by-step.
Create a Group
Browse into Admin -> Security -> Groups and click at +New at the upper right.
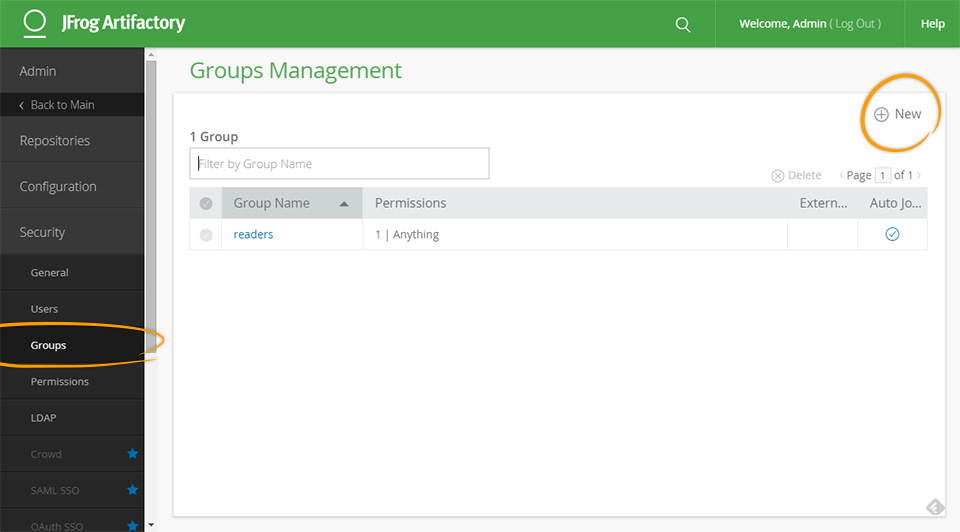
We are going to create a group of user who gain a capability to upload and download any library to/from the system. So I will name the group as "contributors" with description "A group for library contributors". For the Users pane, leave it untouch.
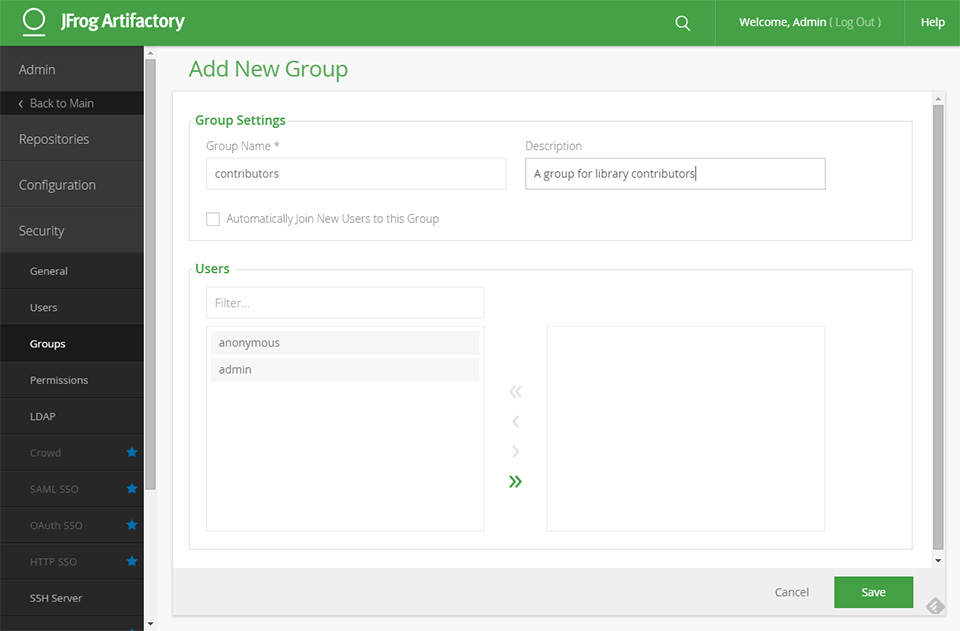
Click Save to create the group.
Create a Permission
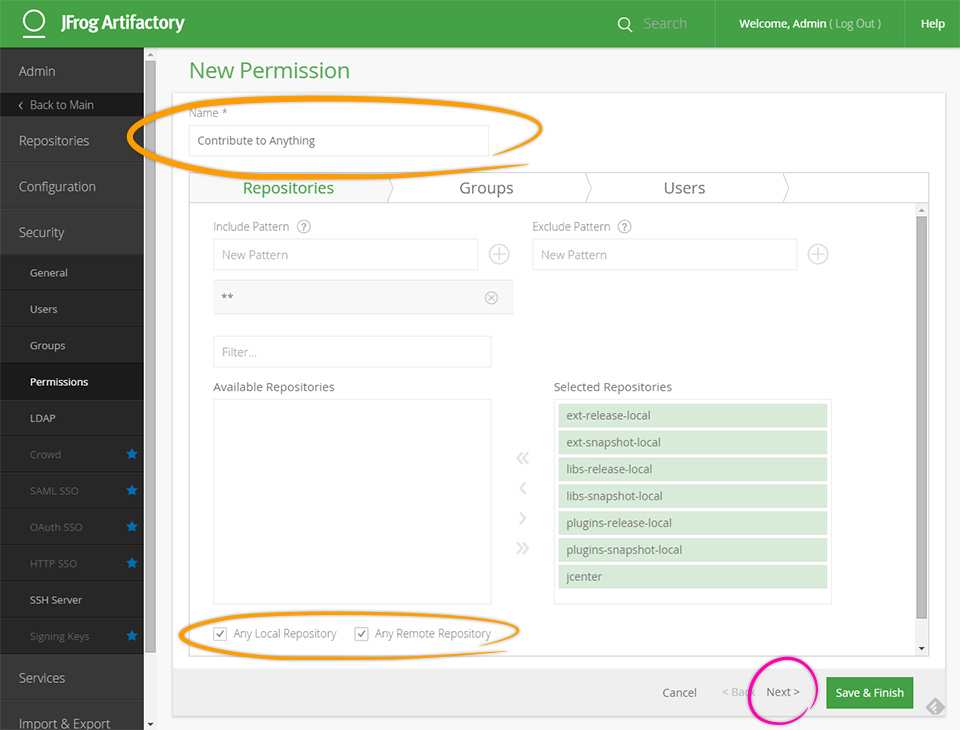
Next step is to assign permissions for user in contributors group. Browse into Admin -> Security -> Permissions and click +New at the upper right.
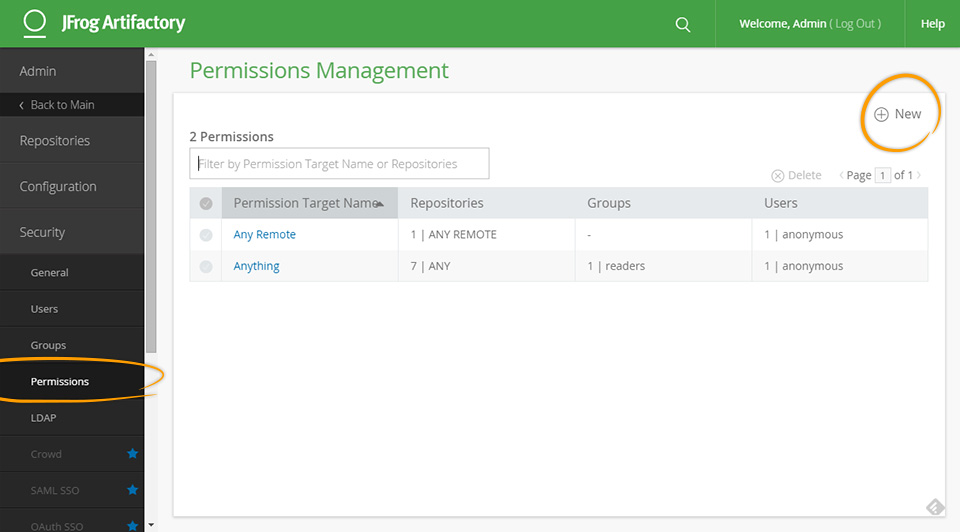
Name the Permission as Contribute to Anything and check both Any Local Repository and Any Remote Repository box to gain an access to any repository in the system to the contributors. Click Next.
In Groups tab, add contributors to the right area and assign the permission like below. Click Save & Finish.
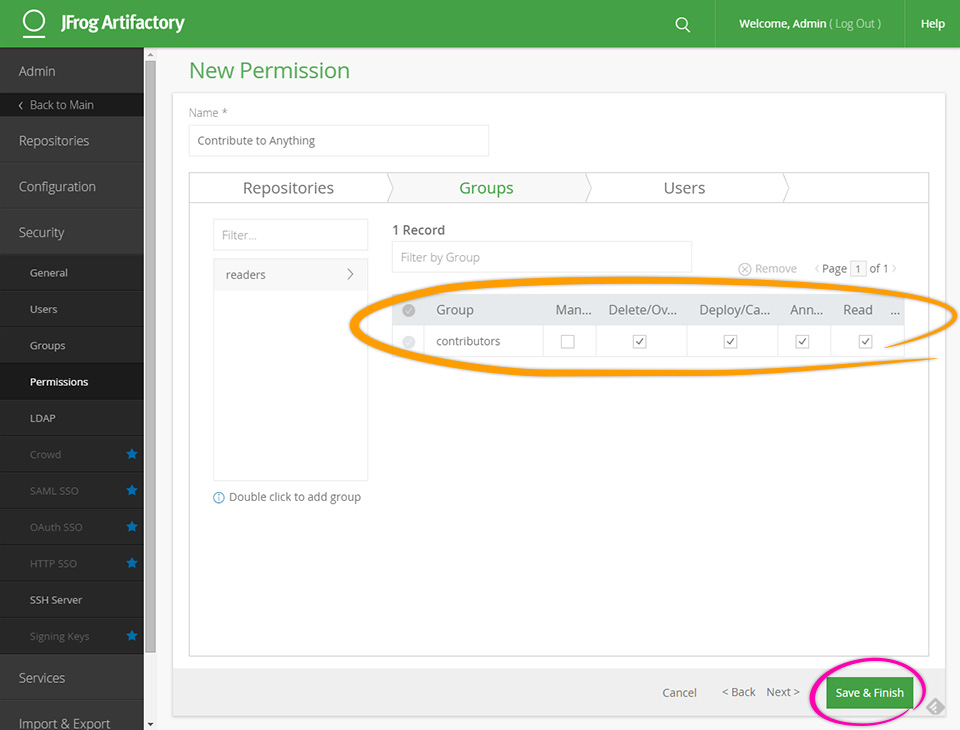
Permissions are now assigned to the contributors group.
Create a new User Account
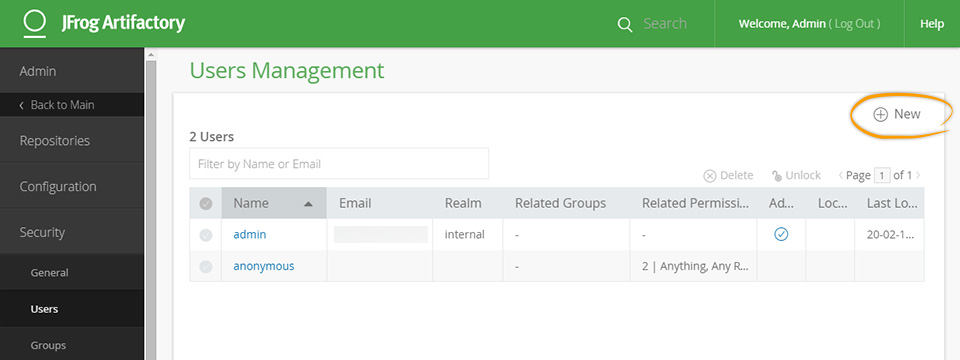
The last step is to create a new user account with contributors permission assigned. Click at +New at the upper right of Admin -> Security -> Users page.
Enter Username, Password and Email Address. In Related Groups area, please add only contributors group to the right pane.
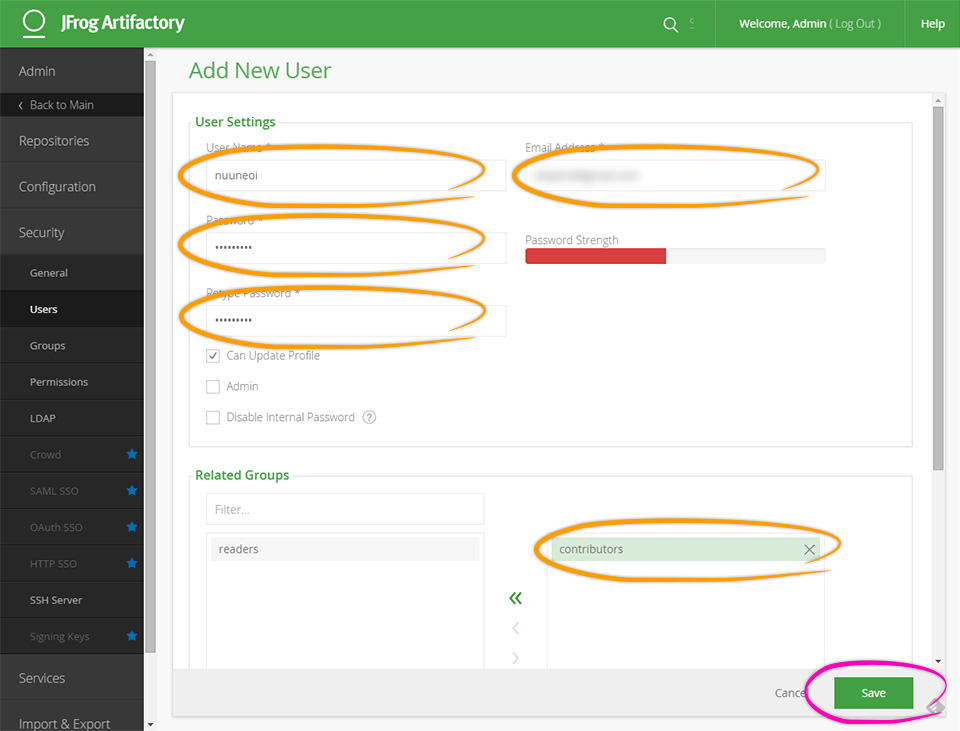
Click Save and ... done ! We now got an account with the proper permission.
If you want to create more user account after this with the same access, you could do it by creating a new user and add it to the contributors group.
But if you want to create a user account with a read-only access. readers is the group you need to assign to that account in this case.
Get an Encrypted Password
In the next step, password is need to be used in gradle script and it's not good to use the clear text version of password. Fortunately Artifactory provides a way to use an encrypted password instead and to acquire this piece of information, you need to logout from admin and login with the account created in previous step.
Once logged in, click on your username at the upper right of the page.
Enter your password and click Unlock.
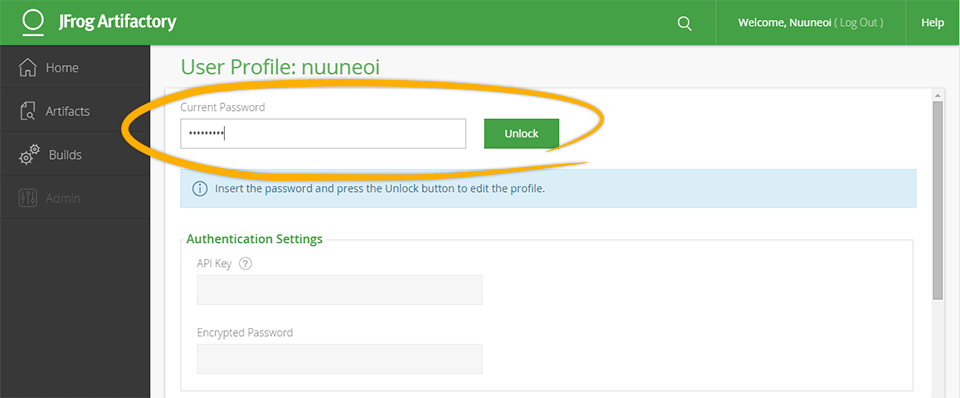
Some data will be revealed.
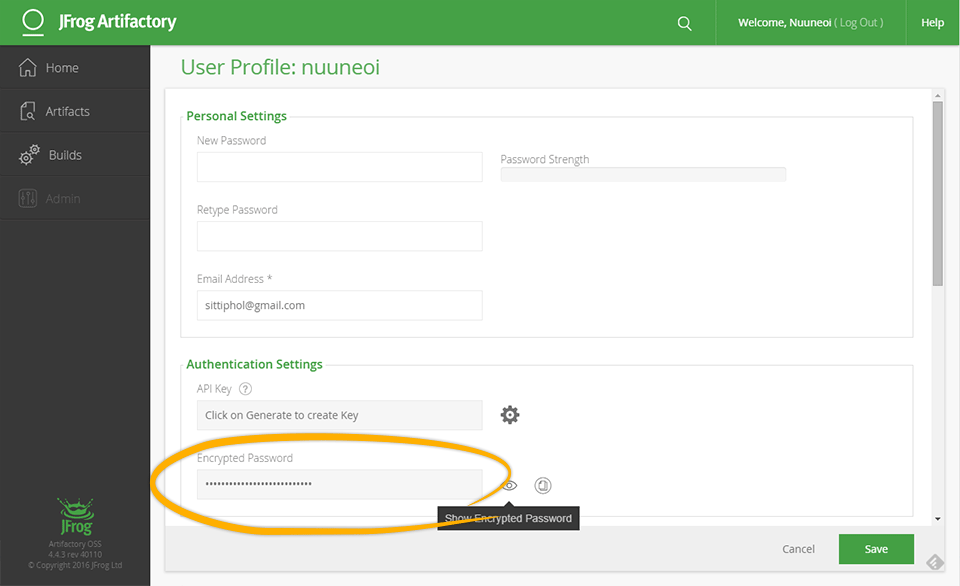
Copy text inside Encrypted Password box and keep it somewhere. We will use it in the near future.
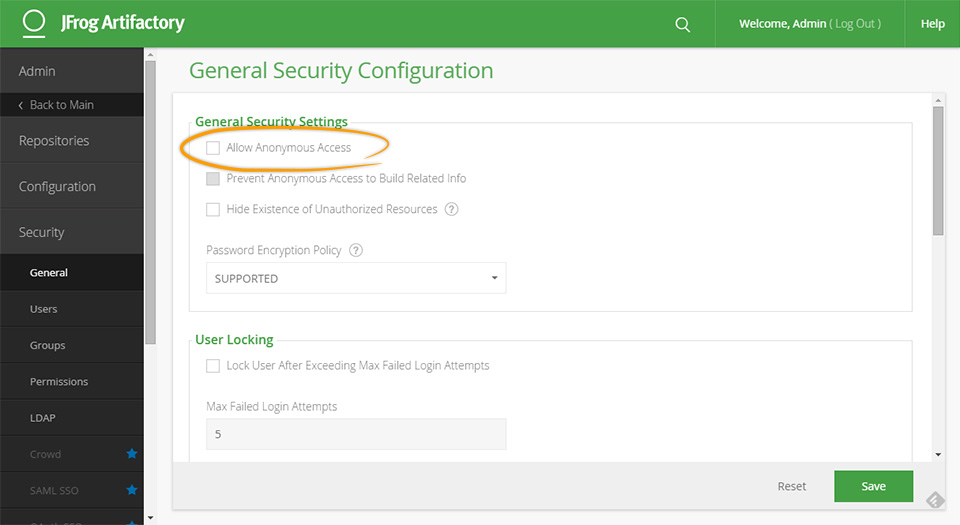
Switch Artifactory to Private mode
In default settings, the repositories hosted in Artifactory are publicly accessible. We need to switch to Private mode and let only allowed user(s) to access the repository.
To turn on Private Mode, just simply uncheck Allow Anonymous Access in Admin -> Security -> General page.
Server is now configured and ready to use !
How to upload Android library to Artifactory from Android Studio
Now it's time to start working on Android Studio. To upload a library to Artifactory, we need to modify some gradle script. First step is to define username and encrypted password for the account on Artifactory set up in previous step. Since these information will be visible in the gradle script so we better put them in the file that will not be uploaded to version control. Let's put them into HOME_DIR/.gradle/gradle.properties
For those who are not familiar with this file. It is a global gradle script used in every single gradle project's compilation step. So if we declare anything in this file, those datas will be accessible in Android project's gradle script as well.
I believe that you, developers, must know already that what the HOME_DIR is for each operating system. For Mac OS X and Linux, it is ~ while in Windows, it is C:\Users\USERNAME for the general case. Try to browse into that folder, you will see .gradle directory there. If there is not, you go to the wrong directory.
Create a gradle.properties file inside HOME_DIR/.gradle/ directory if it doesn't exist or modify it if it does. Adding two lines of script like below and replace YOUR_USERNAME และ YOUR_ENCRYPTED_PASSWORD with your username and encrypted password obtaind in previous step.
# HOME_DIR/.gradle/gradle.properties

artifactory_username=YOUR_USERNAME
artifactory_password=YOUR_ENCRYPTED_PASSWORD
Now open build.gradle file placed at the top level in your Android project. Add a line of classpath code like below.
buildscript {
    dependencies {
        // Add this line
        classpath "org.jfrog.buildinfo:build-info-extractor-gradle:4.0.1"
    }
}
Open build.gradle placed inside your Library Module that you need to upload to Artifactory. Insert two lines of code shown below at the very first line of the file.
apply plugin: 'com.jfrog.artifactory'
apply plugin: 'maven-publish'
And add these lines at the end of the same working file.
def libraryGroupId = 'my.group.package'
def libraryArtifactId = 'thelibrary'
def libraryVersion = '1.0.0'
Code shown above will result the form of dependency as compile 'my.group.package:thelibrary:1.0.0' when it's available on repository. Please feel free to change libraryGroupId, libraryArtifactId and libraryVersion to anything you want.
In the same working file, add these lines at the end of file.
publishing {
    publications {
        aar(MavenPublication) {
            groupId libraryGroupId
            version libraryVersion
            artifactId libraryArtifactId

            artifact("$buildDir/outputs/aar/${artifactId}-release.aar")
        }
    }
}

artifactory {
    contextUrl = 'http://IPADDRESS:8081/artifactory'
    publish {
        repository {
            repoKey = 'libs-release-local'

            username = artifactory_username
            password = artifactory_password
        }
        defaults {
            publications('aar')
            publishArtifacts = true

            properties = ['qa.level': 'basic', 'q.os': 'android', 'dev.team': 'core']
            publishPom = true
        }
    }
}
And don't forget to change IPADDRESS to your server's IP address.
Well done. Now scripts are ready !
Upload the library
It is incredibly easy to upload the library. Just open Terminal inside Android Studio.
And type to following command.
Windows:
gradlew.bat assembleRelease artifactoryPublishMac OS X & Linux:
./gradlew assembleRelease artifactoryPublishLet it does its job and wait until BUILD SUCCESSFUL is shown on the screen.
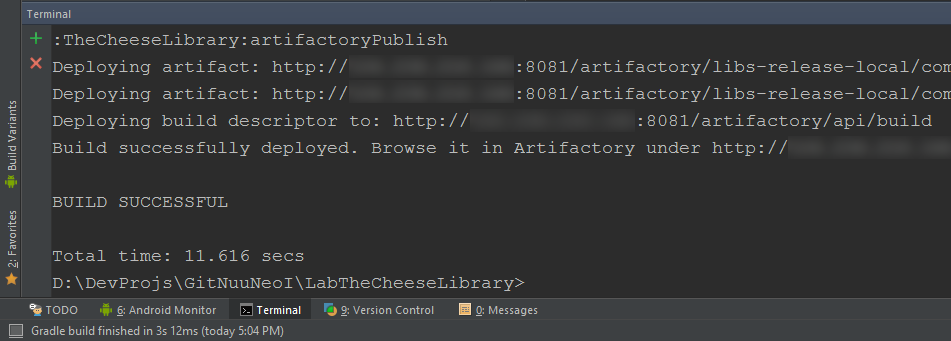
At this step, your library is now successfully uploaded to your private Maven Repository. Congrats !
Verify the upload binary
Browse into your Artifactory control panel http://IPADDRESS:8081/artifactory and click at Artifacts -> libs-release-local. You will see the library uploaded shown inside there with some metadata like deployer's username.
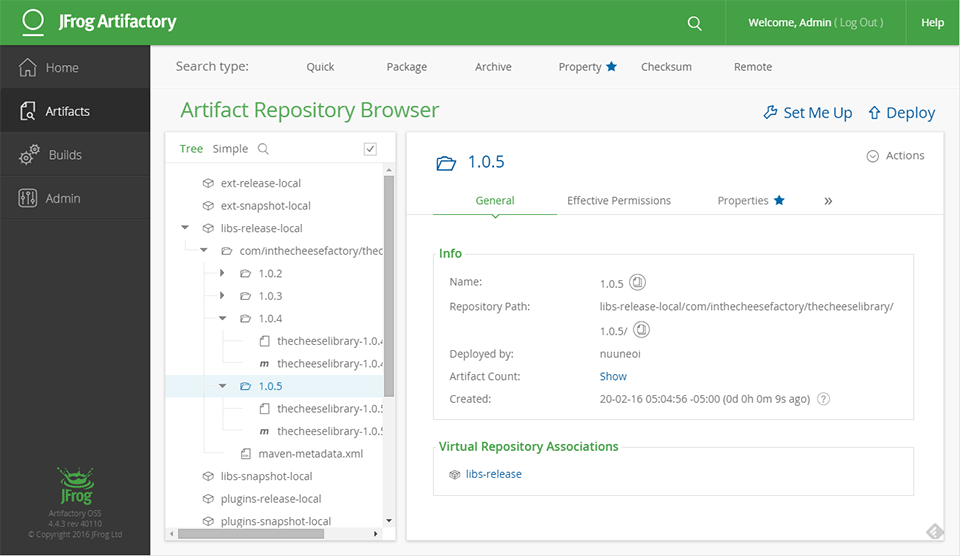
The repository can be accessed through browser at http://IPADDRESS:8081/artifactory/libs-release-local/. Please feel free to give a check.
Library Usage
Library artifact is now ready to be used. To use it in your project, you need to declare the maven url that points to your repository's address along with the credentials inside project level build.gradle.
Add maven { ... } part of code like below: (And sure, don't forget to change IPADDRESS to your server's IP address)
allprojects {
    repositories {
        jcenter()
        // Add these lines
        maven {
            url "http://IPADDRESS:8081/artifactory/libs-release-local"
            credentials {
                username = "${artifactory_username}"
                password = "${artifactory_password}"
            }
        }
    }
}
Open build.gradle inside module that you want to use the library and simply add a dependency with the very familiar form.
dependencies {
    compile ''my.group.package:thelibrary:1.0.0"
}
Now it's all done. You can now:
- Setup your own Maven Repository (either private or public one)
- Upload a library to repository with full user access control.
- Download a library from repository with full user access control.
Library distribution is now far more systematic than any other distribution method and it now doesn't matter how many libraries or how many version of libraries you have. Things are now well organized. =)
Hope that you will find this blog useful !
Ah ... as a gift. If this blog has your interest, this "How to distribute your own Android library through jCenter and Maven Central from Android Studio" might has too. If you want to upload your own library to the public standard Maven Repository like jcenter or Maven Central, that blog will show you how. And again, hope you find it useful =)
Cheers.
 |
Author: nuuneoi (Android GDE, CTO & CEO at The Cheese Factory) A full-stack developer with more than 6 years experience on Android Application Development and more than 12 years in Mobile Application Development industry. Also has skill in Infrastucture, Service Side, Design, UI&UX, Hardware, Optimization, Cooking, Photographing, Blogging, Training, Public Speaking and do love to share things to people in the world!
|