Android Studio 1.3's stage is closed to the stable release. New features are keep coming including full NDK support. And it seems like some major change is also being waited for its good time to hatch such as a new Gradle Build Tools with the newly designed DSL (gradle script code structure).
I found it is very interesting after an hour of playing. So I decide to write this blog to introduce you guys the upcoming changes of the build tools to let you prepare.
What is Android Gradle Build Tools?
In case you don't know yet. Android Gradle Build Tools is a runtime used for processing module's build.gradle file before passing it forward to Gradle for the furthur step.
Gradle Build Tools' version is declared in project's build.gradle like below:
dependencies {
    classpath 'com.android.tools.build:gradle:1.2.3'
}
Each version of Gradle Build Tools can work with the supported Gradle version listed below.
| Android Gradle Plugin | Gradle |
| 1.0.0 - 1.1.3 | 2.2.1 - 2.3 |
| 1.2+ | 2.2.1+ |
And the syntax we use these days to write Gradle Script in build.gradle file is defined in Android Gradle Build Tools. We call it DSL (Domain-Specific Language).
The new Android Gradle Build Tools
After DSL hasn't been touched since the launch of Gradle Build Tools 1.0, Android Studio team has decided to do the major change with the new Gradle Build Tools which is still in the experimental stage by change its base to Gradle's new component model mechanism allows significant reduction in configuration time. However development teams are working hard trying to remove these current changes to minimize the migration process from the traditional plugin in the future.
Anyway IMHO the new DSL looks pretty good. I must say that I am convinced to change since the new DSL structure and naming is more meaningful than it currently is.
To try the new Gradle Build Tools, just simply change the build tools' version in project's build.gradle to
dependencies {
    classpath 'com.android.tools.build:gradle-experimental:0.1.0'
}
Please note that this new version of build tools works with just-released Gradle 2.5 only so you need to install it first by modify distributionUrl line in gradle/gradle-wrapper.properties file placed in your project.
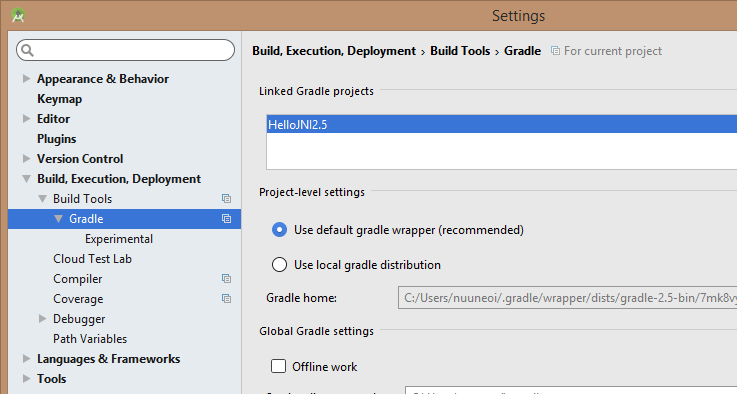
distributionUrl=https\://services.gradle.org/distributions/gradle-2.5-bin.zipEnter settings page (File -> Settings on Windows or Android Studio -> Preferences on Mac OS X) and make sure that you check Use default gradle wrapper.

And then modify module's build.gradle file from:
apply plugin: 'com.android.application'

android {
    compileSdkVersion 22
    buildToolsVersion "23.0.0 rc3"

    defaultConfig {
        applicationId "com.inthecheesefactory.hellojni25"
        minSdkVersion 15
        targetSdkVersion 22
        versionCode 1
        versionName "1.0"
    }
    buildTypes {
        release {
            minifyEnabled false
            proguardFiles getDefaultProguardFile('proguard-android.txt'), 'proguard-rules.pro'
        }
    }
}

dependencies {
    compile fileTree(dir: 'libs', include: ['*.jar'])
    compile 'com.android.support:appcompat-v7:22.2.0'
}
to
apply plugin: 'com.android.model.application'

model {
    android {
        compileSdkVersion = 22
        buildToolsVersion = "23.0.0 rc3"

        defaultConfig.with {
            applicationId = "com.inthecheesefactory.hellojni25"
            minSdkVersion.apiLevel = 15
            targetSdkVersion.apiLevel = 22
            versionCode = 1
            versionName = "1.0"
        }
    }
    android.buildTypes {
        release {
            isMinifyEnabled = false
            proguardFiles += file('proguard-rules.pro')
        }
    }
}

dependencies {
    compile fileTree(dir: 'libs', include: ['*.jar'])
    compile 'com.android.support:appcompat-v7:22.2.0'
}
You can notice that structure are quite different. com.android.application is now changed to com.android.model.application. = operator is required for the most properties as well as += operator which is used to add element(s) to the collection. Some property's name that are not so clear in the term of meaning are also adjusted, for example, minSdkVersion is now changed to minSdkVersion.apiLevel
Well, let's sync project with gradle files to apply the change.

And then simply run it. Everything works fine as expected with the more meaningful syntax, built with new-fresh Gradle 2.5.

Give NDK support a try
Android Studio 1.3 was proudly announced with full NDK Support. So let's give a try with some very simple native codes. First of all, you need to define a NDK's directiory to project's local.properties file. Please note that you can use both NDK r10e available in Android NDK Downloads Page and NDK Bundle available in SDK Manager.
ndk.dir=PATH_TO_NDK_ROOTCreate HelloJni.java somewhere in your java package.
public class HelloJni {
    public native String stringFromJNI();
}
Make a jni folder inside src/main and create hello-jni.c file with the content shown below.
hello-jni.c
#include <string.h>
#include <jni.h>

jstring
Java_com_inthecheesefactory_hellojni25_HelloJni_stringFromJNI( JNIEnv* env,
                                                  jobject thiz )
{
#if defined(__arm__)
  #if defined(__ARM_ARCH_7A__)
    #if defined(__ARM_NEON__)
      #if defined(__ARM_PCS_VFP)
        #define ABI "armeabi-v7a/NEON (hard-float)"
      #else
        #define ABI "armeabi-v7a/NEON"
      #endif
    #else
      #if defined(__ARM_PCS_VFP)
        #define ABI "armeabi-v7a (hard-float)"
      #else
        #define ABI "armeabi-v7a"
      #endif
    #endif
  #else
   #define ABI "armeabi"
  #endif
#elif defined(__i386__)
   #define ABI "x86"
#elif defined(__x86_64__)
   #define ABI "x86_64"
#elif defined(__mips64)  /* mips64el-* toolchain defines __mips__ too */
   #define ABI "mips64"
#elif defined(__mips__)
   #define ABI "mips"
#elif defined(__aarch64__)
   #define ABI "arm64-v8a"
#else
   #define ABI "unknown"
#endif

    return (*env)->NewStringUTF(env, "Hello from JNI !!  Compiled with ABI " ABI ".");
}
Please don't forget to change com_inthecheesefactory_hellojni25 to match HelloJni.java's package name or it will just simply not working.
For those who are familiar with NDK, you might notice that Makefiles aren't needed anymore.
And here is the final file structure.

Now let's test the JNI code in MainActivity.java by placing code below at the very last line of MainActivity class.
public class MainActivity extends AppCompatActivity {

    ...

    static {
        System.loadLibrary("hello-jni");
    }
}
Modify onCreate like this.
    @Override
    protected void onCreate(Bundle savedInstanceState) {
        super.onCreate(savedInstanceState);
        setContentView(R.layout.activity_main);

        Toast.makeText(MainActivity.this,
                        new HelloJni().stringFromJNI(),
                        Toast.LENGTH_LONG)
                .show();
    }
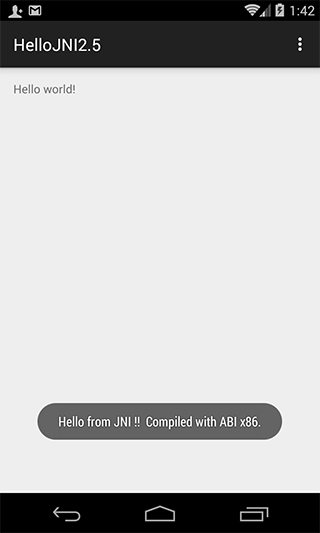
Done! You can now use the native code through Java code. Run to try it.

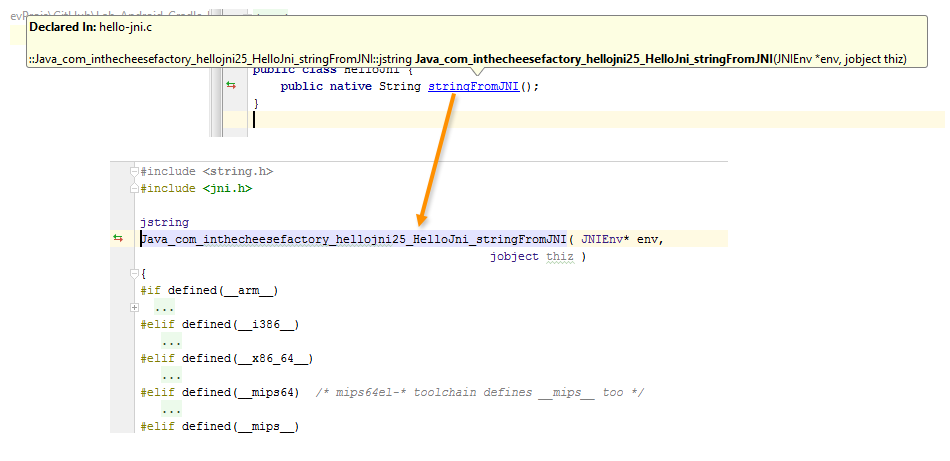
And with the awesome full support of NDK on Android Studio, Java code and Native code can now work seemlessly. If you inspect code in Java, it will jump you to the right place in native code.

Anyway it is still in the experimental stage. Some features are still under development. Better wait for the final release for serious use.
Conclusion
I must say that the new Gradle Build Tools is very interesting. Major change to DSL looks really promising and far more meaningful than the current one. The great code should be able to tell what it does, agree?
However it is still in the experimental stage. The DSL is not final yet. We better just study and know its existence rather than switching to the new one right now. Anyway I believe that it would not be so long until the stable release available for real use. Be prepared !
More information available here >> Experimental Plugin User Guide
=)
 |
Author: nuuneoi (Android GDE, CTO & CEO at The Cheese Factory) A full-stack developer with more than 6 years experience on Android Application Development and more than 12 years in Mobile Application Development industry. Also has skill in Infrastucture, Service Side, Design, UI&UX, Hardware, Optimization, Cooking, Photographing, Blogging, Training, Public Speaking and do love to share things to people in the world!
|

